The Victron Cerbo GX gives you a central way to monitor and control your camper van or off-grid electrical system. Victron has offered two Graphical User Interfaces (GUIs) for several years. The features in the interfaces are almost the same, but the look is Oh. So. Different. If you have a Cerbo GX or Ekrano GX and didn’t realize the flexibility you have for your touch screen appearance, then this post is for you!
This blog provides a comparison and explains how to switch between the Victron Cerbo user interfaces, the Classic GUI and the New GUI. That’s right, there’s another super thoughtful name from Victron…”New GUI”. We can’t wait to talk about the “New New GUI” in another few years.
Feel free to check out this video from Victron highlighting the New GUI. Keeping reading for our take. And let’s get this out of the way: I’m biased. I’m on Team New GUI. The look is a little sleeker, more information is available on fewer pages, and it takes less taps to navigate. We’re starting to see some features available only on the New GUI, and we expect that trend to continue. But to be honest for now both user interfaces offer essentially the same information.
Before we dive into the details, check out this high-level comparison of the two interfaces.
|
Feature |
Classic GUI |
New GUI |
|
Default display |
Often yes |
No |
|
Firmware version |
Any version |
v3.50 or higher |
|
Layout style |
Familiar look |
More modern |
|
Navigation |
More taps |
Fewer taps |
|
Future feature support |
Stable |
Stable Stronger moving forward |
|
Best for |
Familiarity |
New installs Long term use |
Classic GUI
Most customers are familiar with the Classic GUI Overview page. Chances are that you received a Cerbo GX needing a firmware update, and Classic is the default. Everything (well, almost everything?) you need to know about configuring and using the Classic user interface is covered in this previous blog post.

Tapping the Overview screen gives you the Menu option, and you can scroll down to the Settings options.

We want to call out two specific Settings pages in this blog:
Menu -> Settings -> Firmware -> Online updates is where firmware updates can be completed. Don’t forget that your Cerbo needs a good Wi-Fi connection to the internet for firmware updates as covered in our setup blog.
Menu -> Settings -> Display & language -> User interface is how to customize your touch screen display. In particular, this page is where to switch from Classic GUI to New GUI.
You must install firmware v3.50 or higher to use the New GUI.
And don’t worry, when selecting an interface you’re not making a life commitment. Feel free to switch back and forth between the two user interfaces to see which one is best for you.
You may have heard of a powerful add-on for the Victron display called GuiMods. Victron incorporated many of the GuiMods enhancements into the New GUI, so now GuiMods is deprecated and not necessary. We highly recommend running the New GUI, and these included features are one of the reasons!
New GUI
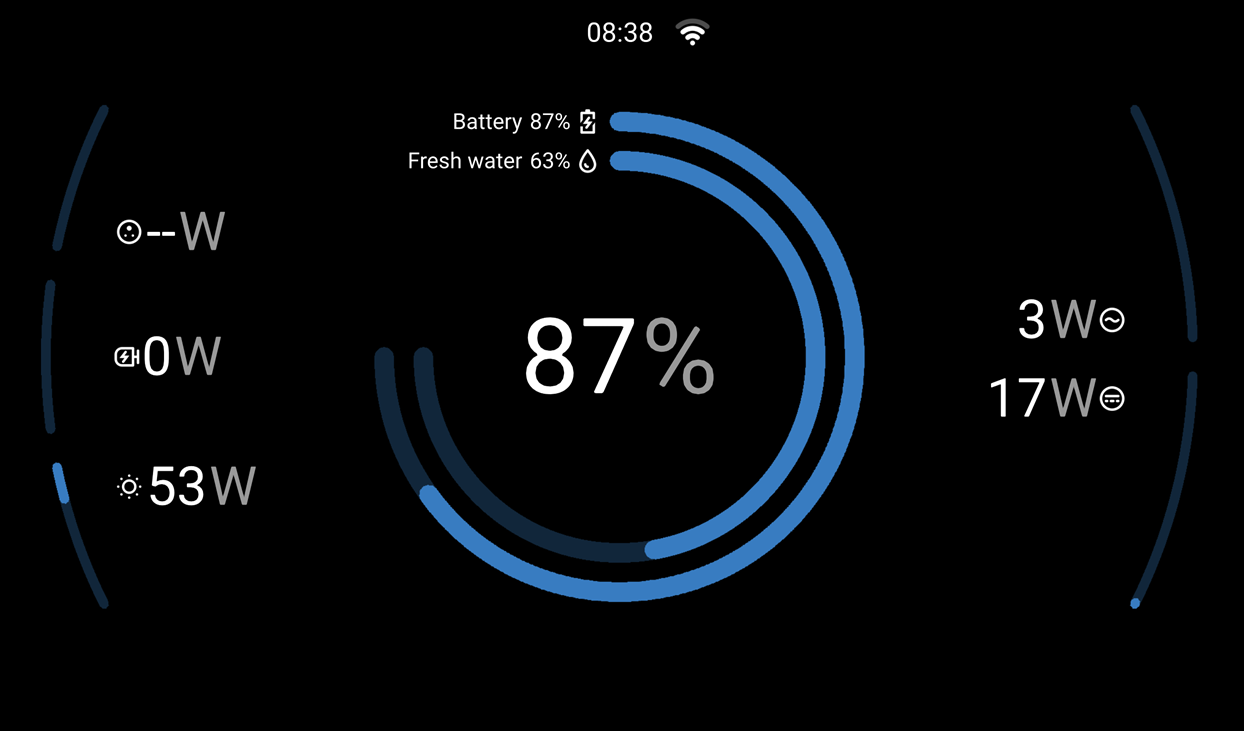
The New GUI features an improved layout requiring less navigation and presenting more information on each screen. As in Classic, you tap the screen to “wake” the interface, and your primary screen navigation options show along the bottom. In the New GUI, these pages are termed Brief, Overview, Levels, Notifications, and Settings. You have the capability to set the default Start page that’s shown after the screen returns from sleep, and you can hide certain screens like Brief to suit your preferences. There is also a Boat page that can be enabled as the 6th main navigation screen.
The pages shown below are with the Display mode set to Dark. You can also set the Display mode to Light.
The Brief page shows charging sources on the left, State of Charge & a snapshot of Levels in the middle, and loads on the right. Brief is exactly that, a brief high-level summary of your system status.

The Overview page is similar to the Classic Overview. As in the Brief page, sources are on the left and loads are on the right. You can tap each source or load to “dive in” to an expanded view of each device. The center of the Overview shows your battery bank and your inverter/charger (is it a charging source or is it a load!? Yes!? depending on what’s plugged in.)
Some quick navigation icons are shown at the top left of any page that’s “awake”, as shown in the following screenshots starting with the Overview. These icons provide quick navigation to set your inverter/charger mode (On, Charger only, or Off) and to control switches & relays. Victron will probably add even more icons here over time.

The Levels page shows all connected Tanks levels and temperature sensors (Environment in Victron-speak).

The Notifications page shows warnings and alarms from all connected devices. These notices include 3rd party devices like SOK batteries with Victron Communications and the Wakespeed regulator in a secondary alternator kit. If everything is swell in your system, it should read No current alerts like the picture below. If you’ve got an alarm that you can’t resolve, maybe it’s time to contact us.

The Settings page is used primarily during your commissioning phase. The Settings -> General -> Display page is useful for tailoring many display preferences to suit your needs.

As in Classic, we’ll call out two specific New GUI Settings pages pertinent to this blog:
Settings -> General -> Firmware -> Online updates is where firmware updates can be completed. Don’t forget that your Cerbo needs a good Wi-Fi connection to the internet for firmware updates as covered in our updated setup blog.
Settings -> General -> Display & Appearance -> User interface is how to customize your touch screen display, including switching back to the Classic GUI from the New GUI.
As you can see, the page names and navigation is ever so slightly different between the two interfaces, but the information is comparable. Note that in recent Victron firmware releases, we’re seeing more information that is available only in the New GUI. An example of this is detailed battery cell information for NG batteries. We expect to see more focus on the New GUI in the future, so that’s yet another reason we highly recommend going New.
Wrap Up
The Cerbo GX user interface lets you customize your camper van touch screen display. For most users, we recommend the New GUI. The Classic GUI is still useful for those that prefer the traditional layout, however some features are now being supported only in the New GUI. Especially when commissioning a new system, we recommend starting by updating the firmware and testing both interfaces. Pick the user interface that works best for you, and enjoy using your system!
Please check out all of our products in our store. If you have any questions about the Cerbo GX user interfaces or any of our products, please don’t hesitate to contact us.
Frequency Asked Questions
1, What is the Victron Energy Cerbo GX?
The Cerbo GX (MK2) is Victron’s communication center that allows you to always have perfect control over your system from wherever you are and maximizes its performance. Simply access the Cerbo directly using a touch screen or remotely using the Victron Remote Management (VRM) portal.
2. What is the difference between the Classic GUI and New GUI on the Cerbo GX?
The Victron Cerbo GX New GUI provides a modern, high-speed interface with improved visualization, including more customization, a Brief view, and support for Light and Dark modes. The Classic GUI features a more traditional, boxy layout and color palette.
3. Do I need to update firmware to use the New GUI on Cerbo GX?
Yes. Update the Cerbo GX to the latest firmware version (v3.50 or higher) to support the New GUI.
4, How do I switch from Classic GUI to New GUI on the Victron Cerbo GX?
First update firmware using the Classic GUI by navigating to Menu -> Settings -> Firmware -> Online updates. Then navigate to Menu -> Settings -> Display & language -> User interface and switch to New GUI.
5. Can I switch back from the New GUI to the Classic GUI on Cerbo GX?
Yes. You can switch between the New GUI or the Classic GUI to suit your preferences. In the New GUI, navigate to Settings -> General -> Display & Appearance -> User interface to switch back to the Classic GUI.
6. How do I connect a Cerbo GX to Wi-Fi?
In order to perform firmware updates or use the Victron Remote Monitoring (VRM) portal, the Cerbo GX needs a strong Wi-Fi connection. The Cerbo’s internal antenna is not meant for long range connections. Using your touch screen, navigate to Menu -> Settings -> Wi-Fi -> Wi-Fi networks. Select the network name you wish to connect to and press on the empty “field” area on the right side of the password row. This will open a virtual keyboard allowing you to enter the password for the Wi-Fi network. After you enter the password and return to that network’s screen, you should see that the “State” row reads “Connected”. If not connected, either your Wi-Fi strength is too low or you incorrectly entered your password. Try moving your Cerbo closer to the Wi-Fi router if you’re sure that the password is correct.
Additional Resources
Cerbo GX setup guides:
How to configure your system using the Classic GUI
How to set up remote monitoring in the New GUI
How to configure your system in the VRM with the New GUI
Cerbo communication center manual:
Product pages


