The Victron ecosystem has very useful monitoring and configuration capabilities when a Cerbo is installed as part of your camper van electrical system. One of the benefits of purchasing a Victron system bundle from Vanlife Outfitters is your access to our expert tech support team. Victron's Remote Monitoring (VRM) allows us to see what your system is doing, and help you remotely troubleshoot or adjust device configuration settings.
The Cerbo can connect to Wi-Fi and the internet, allowing remote access to view system data and edit configuration settings of connected devices.
Settings and firmware updates can be managed for the Cerbo itself, most Victron inverters and battery chargers, all SmartSolar MPPT solar charge controllers and Victron Orion XS DC-DC controllers with VE.direct, all remotely. This gives an extra way to do device configuration & updates from one location, vs. the typical methods of bluetooth with the Victron Connect app, or an MK3-USB cable for Multiplus inverters.
That one location is Victron’s remote monitoring portal, VRM, and it can be accessed from anywhere through the cloud. Since your camper van is typically mobile, it’s great that it can be accessible remotely.
Requirements: Good Wi-Fi connection with the Cerbo to the internet. A Windows OS machine (or virtual machine) with Victron’s VEConfigure installed. TIP: You don’t need to have always-on internet in your rig. Many customers use the VRM at home or temporarily using a hotspot if needed. Your touch screen and system will continue to work with or without internet. The Victron system will store data when not connected then upload it when you’re back home. The Cerbo’s internal antenna is not meant for long range connections, and, it’s inside your metal box van...so a strong Wi-Fi signal may be necessary. The wireless network must be a simple SSID and password login. The Cerbo can not connect to networks where a captive login webpage requires other interaction.
We highly recommend that you set up VRM following the steps below!
Assuming your Cerbo is working and connected with the rest of your system, follow these steps to connect and set up VRM, and invite us to view your system.
If you still need to turn on the Cerbo in the first place, and set it up for your camper van electrical system, here is a more detailed complete blog post. https://www.vanlifeoutfitters.com/configuring-a-victron-cerbo-gx-and-connecting-with-vrm
Either way, now you should be able to view your system on VRM. On a web browser, go to https://vrm.victronenergy.com and click on Installations, and it should look something like this: ('Device List' and 'Remote Console' are highlighted for next steps.)
Very good, you have VRM set up! Now we can talk about using it for remote configuration! Exciting!
Using the VRM remotely from a web browser, or the Victron VRM app for Apple or Android, you can see data or change settings as if you were using the touch screen display locally. You can do this from far, far away, or you can use VRM in your camper van without needing the special MK3-USB cable that you forgot where you stashed. When VRM is connected to your system, the Remote Console view is the same as what you see locally on the touch screen. (Click 'Remote Console' from VRM Dashboard.) From this screen, you can view Notifications and Settings. (Click anywhere on the screen to show the lower toolbar icons, just like on the touchscreen in your van.) 
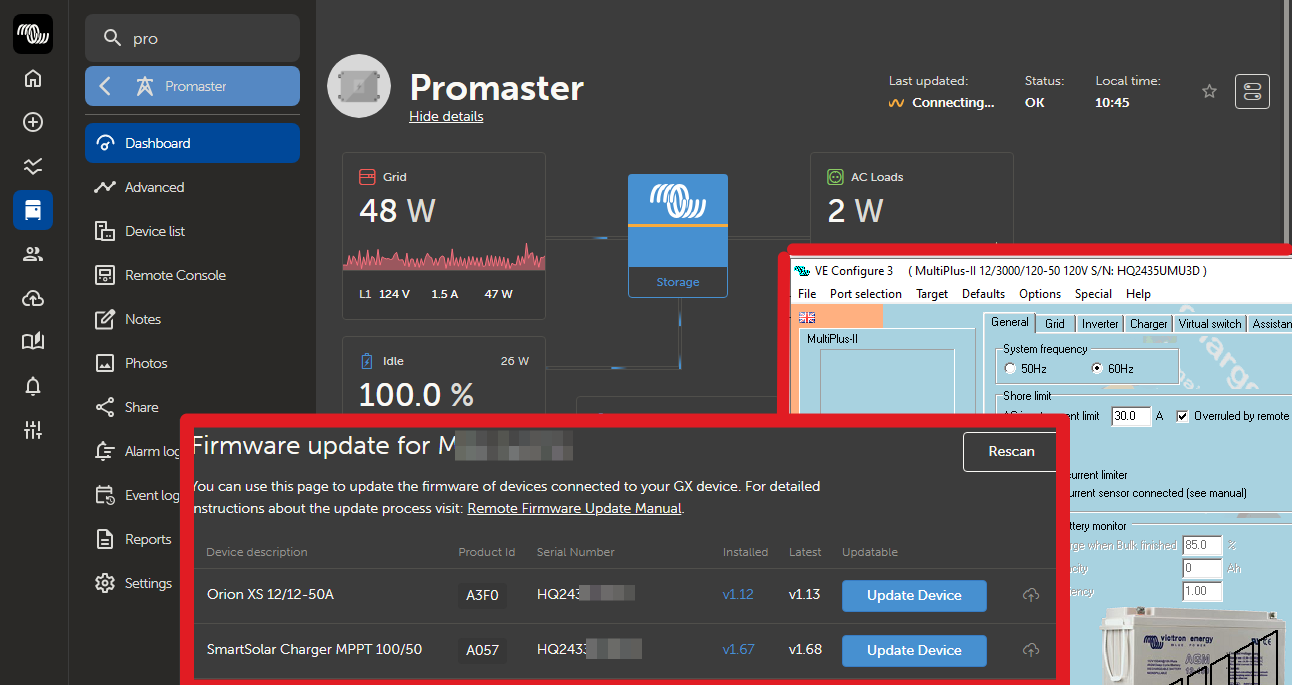
VRM Device list view, and firmware updates: (From the VRM dashboard, click 'Device List'.) 
The device list shows all connected devices. Click the ‘+’ at the right side to see info about each device (serial numbers, current firmware version, etc).
The Firmware Update button takes you to a new screen with the current firmware and the latest available version for each device. The latest f/w should be used for starting up new systems, and sometimes firmware updates can solve certain problems on older systems. If your system is working fine and there’s no new feature that you want, then it is fine to stay with your current firmware version. This is the easiest way to update firmware for multiple devices. For a new system, use the latest firmware for every device. Read the messages carefully when updating firmware. 
Remote configuration of devices via VRM – Multiplus inverters:
For Multiplus settings, a configuration file can be downloaded, edited locally with VEConfigure (windows OS only), then re-uploaded to the Multiplus. Using VRM, this can be done without a special MK3-USB cable, which is the other typical way to configure a Multiplus (locally, MK3-USB cable between the inverter and laptop). (Choose Device list, Remote VEConfigure.) 
A pulldown list shows your Multiplus in case there are more than one, then choose Download. The .rvsc configuration file with the current inverter settings will be downloaded to your local machine. 
You might make a copy of the original file at this point, because VEConfigure will overwrite it with your changes.
Pre-step: install VEConfiguration tools from Victron: https://www.victronenergy.com/support-and-downloads/software
Once VEConfigure is installed, you should be able to double click the downloaded .rvsc file and VEConfigure will be launched, showing the General settings tab.

You can also open VEConfigure manually on your windows machine and select the file.
This would be similar to plugging directly into the inverter with the MK3-USB cable. The windows VEConfigure program is used to view and modify the settings. (If you’re a Mac or Linux user, all this does work fine from windows running on a virtual machine, like VirtualBox).
If you launched VEConfigure manually, Click ‘Port selection’, ‘Fake target from file’ and choose the previously downloaded .rvsc file. Then you should see the General settings tab as shown above. 
The existing settings from your config file populate in the various tabs of VEConfigure:
General tab settings shown here are fine: 60Hz for North America, the default 30a shore power inlet current limit you may want to set at 11amps to avoid tripping 15a outlet circuits with continuous charging load.
Don’t enable the battery monitor unless there is no other shunt in the system. Typically, you want the shunt to be the primary measurement of battery SOC, not the multiplus.
Default values on the Grid tab should also be fine: (Grid code: none, accept wide freq range)
Settings on the Inverter tab are important! 
Typically the shutdown voltages should be set slightly higher than where the battery BMS would disconnect. Check your battery mfg recommended values, and maybe increase by .3 volts to avoid hitting the BMS disconnect threshold. The inverter should stop discharging, before the battery is totally empty, to avoid manual intervention to restart the system.
For a 12v LFP system, here are reasonable settings: (generally multiply by 2 or 4 for 24v or 48v systems, but check your battery manual for specific numbers)
Low shutdown 10.4-10.7 (if under load, voltage can be lower at the Multiplus)
Low restart 12.1, Low pre-alarm 12.4 (Red shows values that you have changed)
Settings on the Charger tab are important! First select Battery type. Likely you have LFP batteries. 
Then adjust the Absorption voltage, Float voltage, absorption time according to your battery manufacturer’s recommendations. 
The charge current should be set appropriately for your battery bank size. Typically, with 2 or more LFP batteries, the batteries can handle more than the maximum charging output of the Multiplus 3000, so the default of 120a is good.
The default settings on the Virtual switch, Assistants, Advanced tabs should be fine.
Save your changes: Choose File, Exit to quit VEConfigure, and it will ask before saving the changes (to the original file name, you don't get to change the name here). Now your file is ready to upload back to the Multiplus via VRM. 
Upload your changes to the Multiplus, via VRM: Back in the VRM Portal device list, under the Remote VEConfigure option, select the Upload button. Choose the .rvsc file you just modified, and click ‘OK’. 
The modified .rvsc configuration file will get uploaded to the Cerbo, which will update and restart the Multiplus inverter. Voila! You have configured your inverter settings, remotely!
Remote configuration of other devices via VRM with Victron Connect:
Typically the Victron Connect app is used on a phone or tablet to configure devices locally, communicating over bluetooth. Once VRM is set up with the Cerbo, any devices that are connected via VE.Direct or VE.Bus can be configured remotely, running Victron Connect on a Windows PC. (Pre-step: Install the VictronConnect Windows program from here: https://www.victronenergy.com/support-and-downloads/software )
Open Victron Connect on your Windows PC. Select the VRM tab on the right, and click on your Cerbo system. 
On the left, it shows your Cerbo (with a link to your VRM dashboard), and on the right, you’ll see all the other devices on your system. 
Click any of these devices on the right, and Victron Connect shows the current status and settings under the upper right gear icon, as if you were connected via bluetooth. But you’re magically far, far away! Just click the settings you’d like to change, and click ‘OK’, presto.
This works for all smart Victron devices which connect to the Cerbo via VE.Bus or VE.Direct ports. The Multiplus shows up in the device list also, and you can see status, but the configuration settings can not be changed through VictronConnect/VRM. Not all Orion DCDC or solar MPPT devices have VE.Direct ports, so those are limited to configuration locally via bluetooth.
Example showing Smartshunt: 
Alternatively, you can open VictronConnect from the VRM web portal Device List. There are two ways to access VictronConnect from the Device List: 
-
Click the Blue oval highlighted button ‘Open in VictronConnect’. This will open and display the system & all devices as described above.
-
Red highlighted buttons: Click one of the Device List ‘+’ tabs, to see more info about that device, (the MPPT Solar Charger is selected below). Then an ‘Open in VictronConnect’ button shows at the bottom. Click that button and VictronConnect opens for just that particular device.
So, that’s it. Amazing technology! You can check on your van from far away, and now you can make changes if needed.
If you want to help out a friend with their Victron system, now you can do it remotely and come off like a genius. If you purchased your electrical equipment from us (thanks!), you can take advantage of our world-class support including adding service@vanlifeoutfitters.com to your VRM account so that we can help you troubleshoot remotely if needed. Again, that’s one of the benefits of purchasing a Victron system bundle from Vanlife Outfitters; your access to our expert tech support team.


