This blog details the steps we suggest to pick solar panels for your rig.
First step, play Tetris!
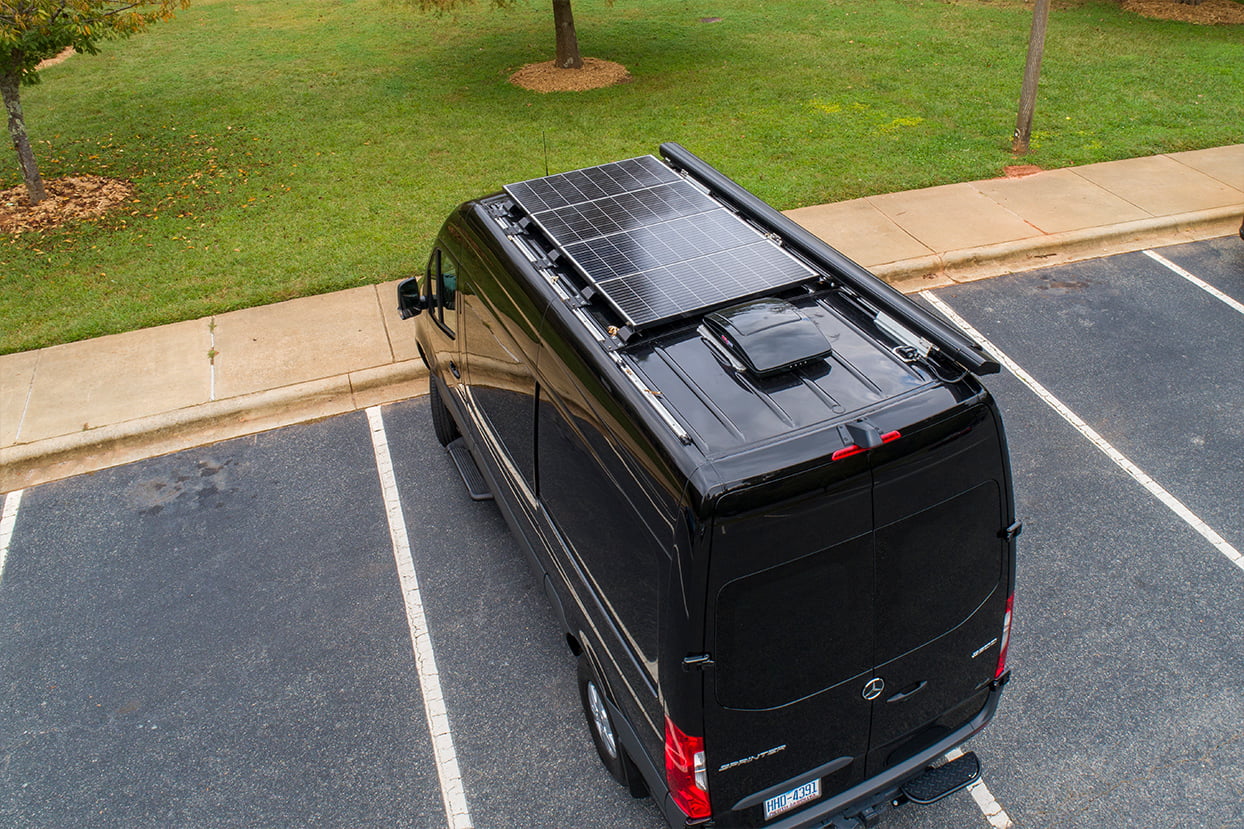
How much space do you have available for solar panels on your roof? Start by determining if you will be mounting your solar panels to a roof rack, OEM roof rails with crossbars, or some other method. Mounting solar panels using Z brackets to crossbars is our go-to approach. Take away space for your vent fan(s), rooftop air conditioner, Starlink mount, recovery boards, rooftop deck, or other rooftop accessories. That remaining space (hopefully there is some left over!) can get filled with solar panels. Just like all of the tradeoffs inside your rig, you have to make tough decisions on what can fit on top too.
Here’s the part that’s not as much fun as it sounds: play panel Tetris, looking at the dimensions of the solar panels while trying to maximize the usable space. Different vendors may have different dimensions for the same panel wattage. Roughly speaking, you will find that panels with lower wattage ratings are correspondingly smaller. Remember that you’re trying to maximize the rooftop area covered with panels, so selecting a smaller panel may allow you to fit more total wattage on your roof. Also keep in mind that mixing different panel sizes is not recommended, so you’re trying to maximize the number of identical panels to fill up your rooftop space.
We find that solar arrays like this Newpowa 220 Watt panel with the long side dimensions of <57″ fit well to maximize the horizontal rooftop space on a van. Because of all those other must-have items, many customers may settle for a 400ish Watt array using two panels mounted horizontally.
The good news is that the above steps are where all the tough decisions have to happen. The rest is “easy”.
Tetris cheat sheet: get out your graph paper, sketch your roof, and see what fits.
| 42.3" x 21.3" | 100 watt Newpowa 12v Black |
| 45.5" x 30.1" | 180 watt Newpowa 12v |
| 52.4" x 30.1" | 200 watt Newpowa 12v |
| 61.7" x 28.0" | 200 watt Newpowa Pro 12v Black |
| 52.8" x 30.1" | 200 watt Newpowa 24v |
| 56.7" x 30.1" | 220 watt Newpowa 12v |
Let’s talk about panel voltage
Solar panels are marketed in 12 V and 24 V options. One manufacturer’s 12 V nameplate does not mean that another manufacturer’s 12 V specifications are identical, and in fact those specs can vary greatly. 48 V options in solar panel sizes fitting vehicles are not readily available at this time.
You picked a 12 V battery bank, you picked a 12 V inverter/charger, so naturally you pick a…well sorry to confuse you, but with solar panels the nameplate voltage doesn’t really matter. What does matter are a few details:
The specifications of the solar panel, particularly the Voc, or the open-circuit voltage which is the maximum voltage that the panel will produce
How the panel(s) are wired, in series or parallel. Wiring panels in series increases voltage, and wiring panels in parallel increases current.
Hopefully a quick set of examples will clarify this confusion. Take a look at the Newpowa 200 Watt 12 V panel specs, and compare those specs to the Newpowa 200W 24 V panel. The 12 V panel has a Voc rating of 24.34 Volts, while the 24 V panel has a Voc rating of 48.68 Volts. You may be thinking those voltages are so high, how can either of these panels work with my 12 Volt electrical system!? The key is that the MPPT charge controller converts the PV (photovoltaic, i.e. solar) side voltage to your BATT (battery) side voltage. In fact, you want the PV side to be a high voltage to allow smaller cables, minimize voltage drop, and minimize losses.
Can I use 24 V solar panels in a 12 V system? Yes. Using a 24 V panel like the Newpowa 200 W 24 V panel in a 12 V system allows you to either use panels in series for more efficiency or use panels in parallel for better partial shading performance (or both! two series panels with two more series panels in parallel). In a small solar array, even using only one 24 Volt panel can still work well for a 12 V system.
Can I use 12 V solar panels in a 24 V system? Yes, with a caveat or two. In order for the MPPT charge controller to start a charging cycle (in other words, for the MPPT to become a useful device by turning on and supplying power to charge your batteries) the PV voltage must be higher than the BATT voltage. In Victron MPPT charge controllers, this voltage difference must be more than 5 Volts. Using two or more Newpowa 200 W 12 V panels in series meets that requirement in a 24 Volt system, as the PV voltage becomes much higher than the nominal battery voltage.
Can I use 12 V or 24 V solar panels in a 48 V system? Yes, with the same caveats as above. Especially with 48 V systems that are typically paired with a secondary alternator kit to rapidly recharge while using a rooftop air conditioner, there may not be tons of space on the roof for solar. That’s just one of the tradeoffs when selecting a 48 V system. Solar arrays with three or more 12 V panels in series or two or more 24 V panels in series are typically required in 48 V systems.
Picking a MPPT charge controller
Victron MPPT charge controllers have two numbers on each device (for example, 100/50), and here’s the breakdown on those numbers:
The first number is the maximum voltage that the controller can tolerate. Do not exceed the nameplate voltage rating or device damage may occur. Also note that the Voc rating discussed above is a nominal value, and the actual maximum voltage varies with temperature. Each solar panel manufacturer provides an additional rating for temperature coefficient for Voc (or another similar name & specification).
The second number is the maximum current that the controller can source to your batteries. If you have more solar power available than the maximum current rating, no damage occurs but you don’t get to use all of the available power. Because our solar panels are seldom oriented perfectly at the sun, and you only get so many days of ideal solar panel per year, a slightly undersized MPPT charge controller may not be noticeable to your charging performance.
These two MPPT numbers sound a little complicated, so use a cheat sheet. And by cheat sheet, we mean this great MPPT calculator from Victron.
Here’s the best way to use the MPPT calculator:
1) Start typing your solar panel vendor and SKU in the Solar Panel field. If you’re in luck, your solar panel model is already in the list. If not, try 1a.
1a) Okay, your model didn’t show up. No problem! Find the Advanced Panel Settings slider and enable advanced mode.
1b) Act advanced. Seven panel specifications become available for editing, and for most manufacturers you need to copy & paste those seven specifications from their panel datasheet to the calculator. Pretty advanced, huh!?
2) Set your system Voltage to 12/24/48. This setting is your battery voltage, because we already told you panel voltage is pretty meh
3) Adjust the Series and Strings parameters to yield the number of panels you can fit. Series is obvious, increase this number if you need/want panels in series. Strings means parallel, increase this number for more Y-branch connectors and panels in parallel. It’s okay to play around with these settings too, adjust series or parallel values and see what the calculator tells you. Some panel configurations offer you a tradeoff, while others just require you to wire your solar array a specific way to make it work.
4) Bonus choice: set your location to see an estimate of how much daily yield your solar panel may provide. But you’re in a van and traveling the world, so maybe you care more if it’s going to rain tomorrow than what your yield would be if you parked in Albuquerque for a month?
Now look on the right side of the calculator for the Result. Victron tells you the best MPPT charge controller for your array, and they show you lots of fun details why it’s the best controller too. Yay!
For some customers, especially those on larger rigs like trailers, going with two MPPT charge controllers with two types of panels may be a useful choice to maximize area. Using two MPPT charge controllers is also a good choice for “ground deployed” solar panels that get temporarily set up in conjunction with fixed rooftop panels. And, you get to play Tetris and use the calculator twice. Fun times.
Wrap up
Maybe you’re the TL;DR type, but we hope you read through the details above. To wrap it up, we suggest the following steps to pick your solar panels:
1) Play Tetris with your panels to fit as many identical panels as possible on your roof
2) Use the MPPT calculator to select your charge controller
That’s not hard! But if you run into any snags, our tech support team is always ready to help you understand more about our solar products and blogs. Contact us!


