If you’re building a camper van electrical system, or planning your vanlife power setup, the first power-up is a big milestone. This blog is Part I of a two-part series on powering up your electrical system for the first time. Part I discusses steps to think about before or during your build. We hope you’ll give this a read, hopefully before you need Part II that focuses on the steps to power up & configure your mobile power system. To be honest, planning for & commissioning your electrical system should be an iterative process, so give both parts a read and let’s get to it.
This blog hopes to provide some of the why to go along with the what when planning for your camper van electrical system. Planning for that first power-up involves two major pieces. One step is having your batteries charged & ready. The second step is a bit more involved, and that’s thinking ahead (thus the planning keyword) and gaining familiarity with your equipment as part of a testbed.
Prepare your batteries
We recommend charging your batteries before wiring them into your camper van electrical system. If you have batteries in series (not something we recommend often at this point with great battery options available at 24 and 48 Volts), then charging the batteries & balancing the internal cells is required. Here's an excerpt from Victron on why, and yes this is a prod to Read. The. Manual. for all of your equipment. The Victron manuals are an exceptional resource, and reading through your manuals makes sure that you understand the features, installation requirements, and safety guidelines for your equipment.
When using batteries in parallel, it's still a good idea to charge them first. Charging those batteries individually is a good idea too. After charging, check each battery’s voltage with a multimeter to confirm that they are at the same voltage. It’s typically not possible to get them exactly the same, but charging with 0.1 Volt (closer is better!) is sufficient. Charging each battery separately to the same voltage helps minimize current flow between batteries when they are later connected in parallel, which is important to prevent damage caused by high currents from connecting different voltages. Lithium batteries are not shipped fully charged, so charging your batteries also provides more capacity so that you don't feel rushed during the steps covered later in this blog when turning on your equipment. Deeply discharging your batteries, also referred to as undervoltage, can be damaging to lithium batteries (moreso than overcharging that is typically protected by the BMS!), so there's another reason to give yourself plenty of margin during your turn on process.
It's critical that your batteries are charged with a proper charge cycle, and the batteries should be charged through your Battery Management System (BMS). If you have selected batteries with an external BMS, that means you need to connect your battery and BMS to charge each battery. Whether your lithium battery has an external or internal BMS, use a charger with a lithium-ion profile and be careful to monitor temperature and overcharging during this step. This is a perfect segue into the next step (or is it the first step?!), which is working on a testbed for your electrical system.
If your batteries have Bluetooth and an app, this would be a good time to use it. Connect to each battery and look at the status. Do your batteries say fully charged (100% State of Charge, SOC) and balanced? Yay!
Some customers find it easiest to use an external battery charger to initially charge their batteries. Using an external charger is simple - just plug into a standard AC receptacle for power and allow each battery to go through a complete charge cycle (go through a bulk stage and get to the low current float stage in lithium batteries). If the compelling reasons to build a testbed below don't sell you, then an external battery charger may also be your best option to get those batteries charged before turning on your system. Our recommendation is to combine a test setup with your initial charging step, and use one of your system charging sources (particularly your Multiplus inverter/charger) to initially charge each battery. More on that now...
Checklist for preparing your batteries
Testing, testing, 1, 2
This camper van build is already a ton of work, and now you're suggesting that I build it twice!? To some degree, yes. If you're finding this blog after your build is done, then you could skip this section. Hopefully you'll read on and see why testing early is important and helpful.
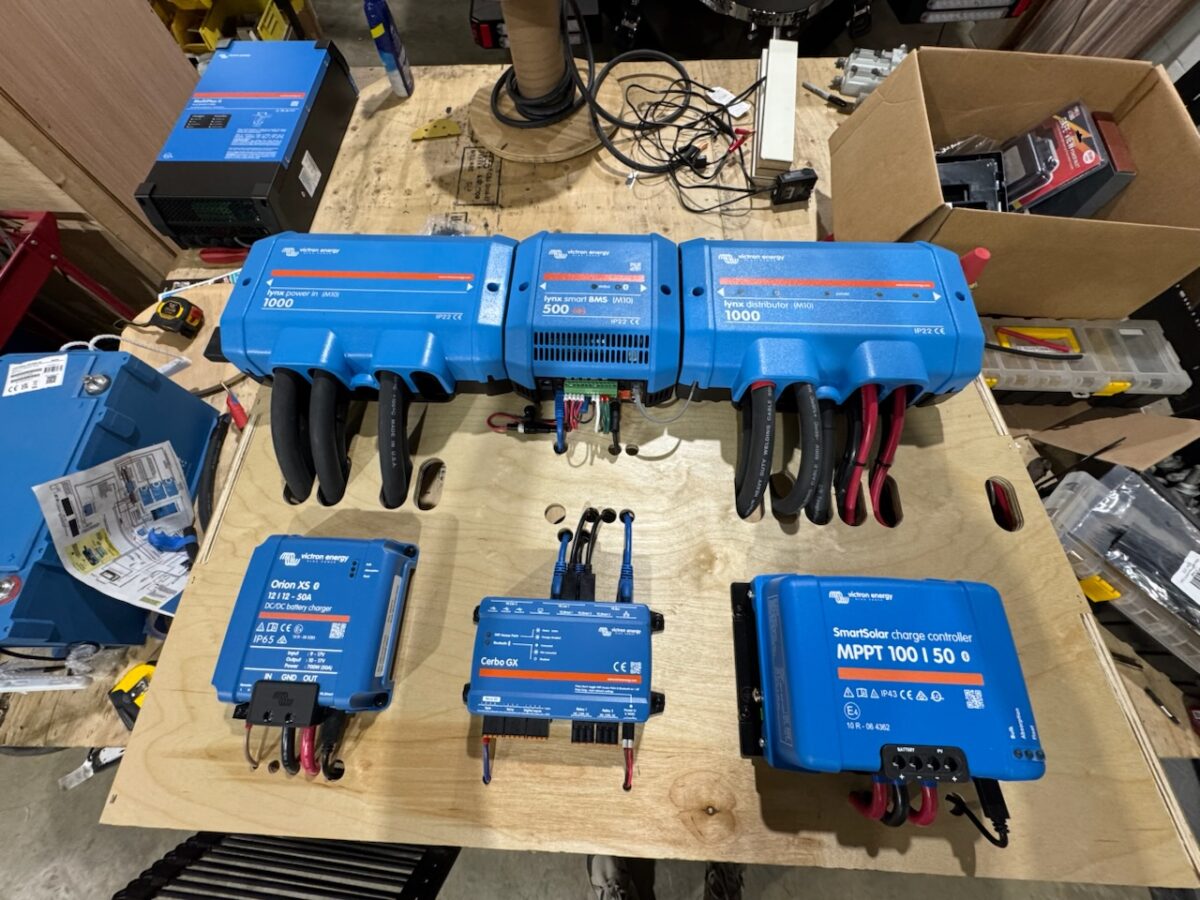
Bench testing doesn't mean that you have to build a complete system either. Go piecemeal. Our recommendation is to slowly add one piece of equipment at a time. Start with your batteries and BMS, add your Distributor, add a charging source, then turn add & turn on a load. Continue that methodical approach with other charging sources & additional loads. If you choose, test something then tear it down and test something else. You don’t need your testbed fully functioning, for example it’s okay to add a DC-DC charger or MPPT without the “source” connection. Your device will still turn on once energized, and you can start using your equipment and complete the configuration step. The whole point is to get familiar with your (future) system.
Why bench test?
- Practice the physical connections. This is your chance to get familiar with the connections on your equipment. Many customers are stripping, crimping, and properly torquing cables for the first time. It's perfectly reasonable to throw away a test lug or two...aren't you better at something after a little practice? Particularly with the high current connections in these electrical systems, it's important that the connections are done properly.
- Learn that your layout can be improved. After assembling some of your equipment, it's just easier to visualize how it all fits together. How do I minimize my battery cable lengths? Gee, these 4/0 cables need a bend radius. Maybe a ML Link would be easier than a cable? Oh, the touchscreen cables aren't long enough, and it needs to be closer to my Cerbo. These are just some examples of lessons learned that are easier to resolve before your build is underway.
- Forget something? Testing and using your equipment before your build is "done" can reduce your panic later. Need fuses for your Lynx distributor? Need an extra VE.Direct cable so your equipment can communicate? Have everything in imperial (SAE) but one item has to be metric...and you're off to the store again.
- It's easier to troubleshoot and resolve issues in a testbed. Moving cables, accessing equipment, or even starting over is so much simpler before the equipment is installed in your rig. And if you’re following our advice to incrementally build & test equipment, problems are presented immediately with an obvious example of cause and effect.
- The manufacturer says so. We've already discussed why you should charge your batteries first. Nomadic says "always bench test AC unit before installing". Other vendors do too. Yeah, we know, those annoying manuals again.
- Work through failures early. Yes, we had to go there. Sometimes a mistake is made, and you need a new fuse, or worse, a new piece of equipment. Didn't notice some shipping damage inside the box? Some unlucky few experience the dreaded Dead On Arrival equipment, which is quite rare but a super bummer to deal with. Find out early by bench testing, and don't wait until you're rushing to be ready for that first road trip.
Consider purchasing a small power supply (bonus tip: the external battery charger discussed above can also operate as a power supply to run DC loads). With a power supply, you can test easily without worrying about your battery cycles. Run your water pump and test those fittings, get familiar with your Cerbo and get the VRM ready for troubleshooting, trial your LED lighting or dimmer switches, the list is endless, but building familiarity with your equipment will save time & heartache later once it's in your rig.
If you're still not sold on a separate testbed, then at least consider building and testing your system incrementally rather than all at once. It's so much easier to isolate problems when something works, you add a piece of equipment, then something doesn't work. That narrows down your focus to what's new rather than staring at a complete system with no clue as to where to begin.
These electrical systems can be complex, and despite a methodical approach some problems may not be easy to identify. In case you run into problems, here’s a super secret (not really) testing tip: make a complex problem easier to solve by cutting it in half, meaning make methodical changes to remove components and narrow down the potential problem. This is also called divide and conquer. Some ways to cut it in half may be to:
- Remove charging sources one by one. If the problem persists, a removed source isn't likely to be your problem, or if the problem is resolved, that recently removed source may be your issue.
- Remove loads one by one. Same idea as removing charging sources: is a particular load causing you trouble?
- Replace a source or a load with an identical copy. This approach can help rule out physical or device problems, but be careful that software or configuration of many devices can be related to the problem. If you replace one device with an identically configured copy and the problem changes, then you're making progress towards finding the culprit. If you replace one device with an identically configured copy and the problem doesn't change, you may not have learned anything, or maybe it's time to try configuration changes.
- Change firmware versions or software configuration items one at a time. Change, test, repeat. Change, test, repeat. If you change 27 settings at one time and something behaves differently...did you identify the problem or just change the scenario? Or even if you did come across a configuration setting that was important, which of those 27 settings was the one?
Whether you’re working on your testbed or in your rig, our tech support team is always available to help you, and you don’t have to wait until you’re “done” to reach out to us. In fact, it’s probably easier on you and us if you’ve been working methodically and have more info to get us started than ‘it’s broke,fix it’.
The bottom line is that after building a testbed you're going to be better at doing something the second time than the first. You’ll be comfortable with your equipment, you’ll have confidence in your system, and you’ll be off enjoying vanlife on your first road trip sooner by planning ahead before powering up your system for the first time.
Common mistakes to avoid
- Not using bench testing to improve your van’s build - practice those connections first, and any bench test error is simply a “lesson learned” that will make your build better and safer
- Building out everything, then being overwhelmed about where to start - it’s okay to be methodical and build confidence in yourself as you incrementally build & test your system
- Making access for maintenance difficult or impossible - connections need to be periodically inspected, or maybe you realized that a mistake was made during commissioning. Do yourself a favor and plan ahead for the capability to access & inspect your equipment after install.
Summary
It’s important to plan ahead before powering on your camper van electrical system for the first time. Charging your lithium batteries fully with a proper charge cycle gets you prepared to start connecting other equipment. We suggest you work methodically and consider a testbed prior to your van build, or alternatively build & use your power system iteratively. Using a testbed helps you:
- practice the physical connections
- plan an optimal layout of your components
- configure and test your equipment
- make it easy to troubleshoot issues
Next Step
Ready to power up? Check out Part II for step-by-step guidance on commissioning and configuration.
FAQ: Powering Up Your Camper Van Electrical System for the First Time
1. Why should I charge my camper-van batteries before installation?
Lithium batteries are typically shipped partially charged, not full. Charging them before installation ensures all cells are balanced and the voltages match across batteries. This prevents high current surges when connecting them in parallel and gives you full capacity when testing or powering on your system for the first time.
2. Do I need to charge each lithium battery separately?
Yes – it’s best to charge each battery individually until their voltages are similar, at least within about 0.1 Volt of each other. Doing this minimizes current flow between batteries when connected in parallel and reduces stress on your system. It’s also a great opportunity to verify that each battery and BMS is functioning properly.
3. What’s the safest way to charge lithium batteries for a van build?
Use a charger designed for lithium-ion profiles and always charge through the Battery Management System (BMS). Monitor temperature and voltage to avoid overcharging. Many builders use an external charger or their inverter/charger (like a Victron Multiplus) to perform the first full charge.
4. What is “bench testing” or a “testbed” for a camper-van electrical system?
Bench testing means assembling and powering your electrical components on a workbench before installing them in your van. It lets you practice making cable connections, confirm proper wiring, configure settings, and verify that devices communicate and operate as expected. This reduces installation surprises and makes troubleshooting far easier.
5. How do I build a simple testbed for my van electrical system?
Start small. Connect your batteries and BMS first, then add one component at a time – a distributor, then a charging source, and then loads. Power up each addition separately to confirm correct operation. You can use an external power supply to run loads without cycling your batteries.
6. What are the benefits of testing my system before full installation?
Testing early helps you:
-
Practice safe, solid cable terminations
-
Optimize layout and cable lengths
-
Confirm that your components communicate properly
-
Catch missing parts or incompatibilities
-
Identify defective equipment before it’s permanently installed
7. What are common mistakes when turning on a van electrical system for the first time?
- Skipping the initial battery charge and balance
-
Connecting batteries with mismatched voltages
-
Over-tightening or under-torquing high-current connections
-
Failing to label or document cable routes
-
Powering up everything at once instead of one step at a time
8. How can I troubleshoot issues during the first power-up?
Take a divide and conquer approach:
-
Remove charging sources or loads one at a time to isolate the issue
-
Replace a suspect component with a known-good on.
-
Revert firmware or configuration changes step-by-step
-
Use your device apps (e.g., VictronConnect or VRM) to check for abnormal readings
9. When should I reach out for help with my van electrical system?
If you’re unsure, don’t wait until something goes poorly. Contact our Technical Support Team before you’re “done.” We can help confirm settings, review the manuals, and troubleshoot issues faster when you’ve been testing methodically.


