This post was originally published in 2023. We think that the content in this blog is still useful, but some things have changed just a little bit: new GUI, new features, same great powerful capability!
Check out our refreshed blogs like Setting up Victron's Remote Monitoring, and inviting Vanlife Outfitters to your system and Configuring your Victron system with VRM for a updated take on these important features.
This post details how we suggest you configure a Victron Cerbo GX for a camper van/RV and, once you’ve done so, how to connect it to Victron’s free remote monitoring and control cloud service called VRM. This guide assumes that you have a MultiPlus inverter/charger as we show in our free example wiring diagrams.
While you’re here, you might also be interested in our blog post about how to monitor water tanks with a Cerbo GX or how to wire up a cooling fan that is turned on automatically using one of the Cerbo GX’s relays and a clever 4-in-one Ruuvitag sensor (temperature, humidity, air pressure, and motion).
Cerbo GX Versions
For a period in 2024 Victron was offering three versions of the Cerbo GX as we detailed in this video (Cerbo GX, Cerbo-S GX and the MK2 model). As of 2025, Victron eliminated the Cerbo GX and the Cerbo-S GX so that there will, once again, be only one single model which is the MK2 version. In other words. the Cerbo GX MK2 replaces the original Cerbo GX and the Cerbo-S GX is no longer available. Victron Energy also offers the Ekrano GX which is similar but has an integrated touch screen.
For the sake of simplicity, we’ll refer to all “GX Devices” (all versions of the Cerbo) as the “Cerbo GX” in this post since they all use the same underlying operating system (VenusOS).
Cerbo GX Configuration
1. Connect a Touch Screen
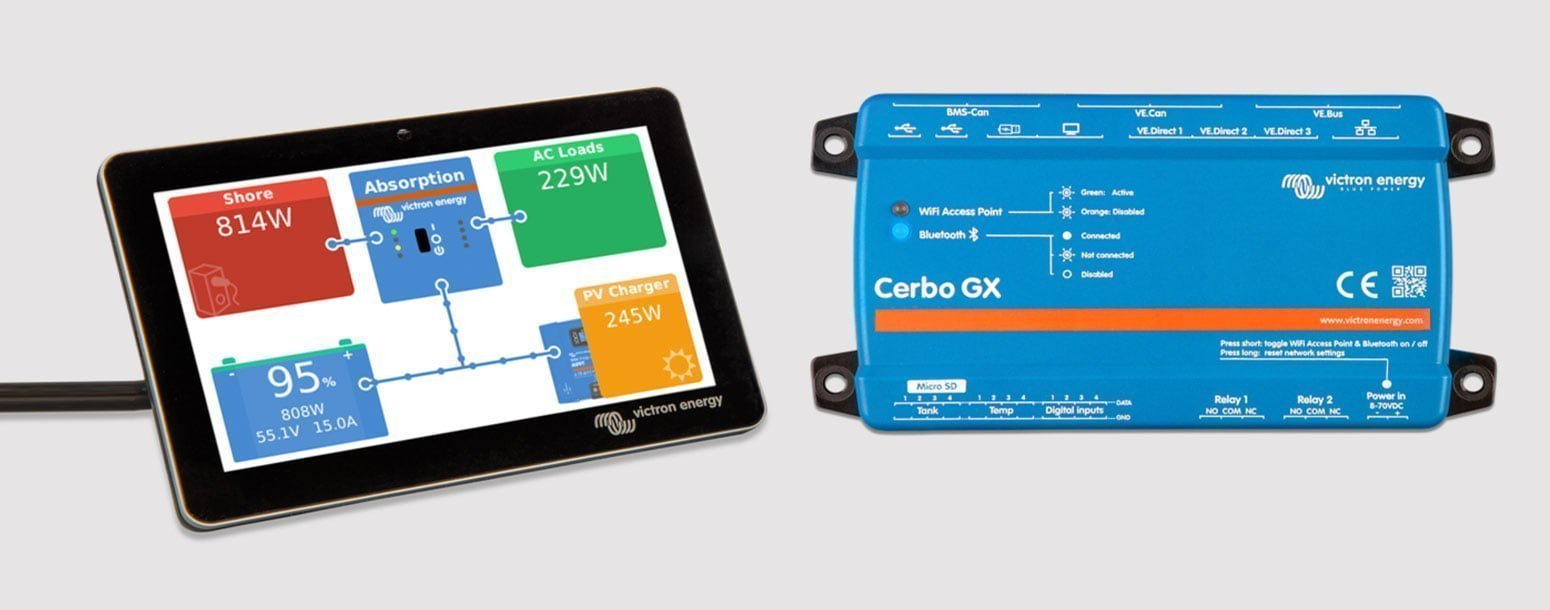
The primary, in-person monitoring and control interface to the Cerbo GX is either the 5″ Touch 50 screen or the 7″ Touch 70 screen. These touchscreens can be powered from any 12-volt USB plug – either one like this in your rig, or the USB port that is right next to the HDMI port on the Cerbo GX itself. The video and touch commands/data require an HDMI connection. If you are placing your touchscreen far away from the Cerbo GX we’ve found this 25′ HDML extension cable paired with a HDMI female-to-female adapter works well.
2. Power on the Cerbo GX
You do this by plugging in its DC power supply cable into the bottom of the unit and making sure the other side of the wire is wired up to your DC positive and negative bus bars/battery terminals. There is an integrated, inline fuse on the DC positive wire that is supplied with the Cerbo GX. Once power has been applied, it will take a minute or two to boot up but you should see some of the LED lights on the Cerbo GX turn on and the touchscreen coming on during the booting process – first with the Victron Energy logo and later with one of the standard screens (pages).
3. Connect the Cerbo GX to a Wi-Fi Network
Tap on the lower right portion of the touchscreen to open the menu bar to access the Menu. Then choose “Settings”, then choose “Wi-Fi” and then “Wi-Fi networks”. This should open a list of available Wi-Fi networks much like any computer or mobile device. Next select the network name you wish to connect to and finally, press on the empty “field” area on the right side of the password row. This will open a virtual keyboard allowing you to enter the password for the Wi-Fi network.

After you enter the password and return to that network’s screen, you should see that the “State” row reads “Connected”. If it doesn’t, it’s likely you need to re-enter the password.

4. Update the Firmware
One of the great things about Victron Energy equipment is that their developers are continually improving the apps and firmware which means you get extra features and stability every time you update the firmware or apps. To update the firmware (the version of Venus OS running the Cerbo GX), open the Menu, choose Settings, and then Firmware. From this screen you want to make sure that “Check and update” is selected on the “Auto update” row and then press the “Press to check” button. From there you’ll either be guided through the update or it will report that you already have the latest version.

5. Customize System Name
Open the Menu, choose “Settings” and then choose “System setup”. Take a look at the first two rows on this screen. The “System name” should be set to “User defined”. You can then press on the empty field area in the “User defined name” row and enter what you want to name your system.

6. Label AC Input 1
We like to choose the appropriate “label” for the AC Input 1 on the MultiPlus inverter charger. In most cases this input is fed from Shore power. From the same “System setup menu” (Menu -> Settings -> System Setup) press on the AC Input 1 row and choose “Shore power”.
7. Enable Remote Console
One of the cool features of VRM (more on that below) is the ability to remotely control your Cerbo GX using the remote console. To enable this we need to update a few settings. Start by entering the Menu, choose “Settings” and then choose “VRM online portal”. Make a note of the “VRM Portal ID” from this screen. We’ll need that a little later when we connect the Cerbo GX to VRM. Then scroll down until you see the the “VRM two-way communication” option and turn it on.

Now go back into Settings and choose “Remote Console”. We recommend pressing on the “Enable password check” and choosing a password that you will need to enter when using Remote Console from VRM. Then make sure that “Enable on VRM” is turned on.
Finally, you need to power cycle/reboot your Cerbo GX before these settings take effect. One simple way to do this is to pull the power supply plug from the bottom of the Cerbo GX and then replug it.

8. Boat & Motorhome Overview & Units
Open the Menu, choose “Display & language” and then turn on the “Show boat & motorhome overview”. This adds a new “page” or “screen” to your Cerbo GX that allows you to control a MultiPlus inverter state (on, off, inverter only, charger only) as well as the AC input current. Next, choose “Units” from the same “Display & language” menu and change to F from C (Fahrenheit).
Settings -> Display & language -> Units -> set temp to F (From C – available in Venus OS 2.9+)
9. Enable DC System
Open the Menu, choose “System setup”, scroll down to “Has DC system” and turn that on. What the heck is this? Basically, it just tells the Cerbo GX that there are DC loads in the system that you want to monitor – such as your DC load center/fuses. When turned on you see the DC “box” on the display screens/pages. In a van/RV, there is almost always a DC system but in some other applications, such as an off-grid install, there may not be any DC loads.

10. Set Time
Open the Menu, choose “Settings” and then “Date & Time”. From that screen, press on “Date/Time local” to set your local time and then press on “Time zone” to select your local time zone.
11. Bluetooth Settings
Open the Menu, choose “Settings” and then choose “Bluetooth”. From this screen, you’ll want to make sure that Bluetooth is turned on (“Enabled”) and then press on “Pincode” to set the login code to connect to the Cerbo GX via Bluetooth using VictronConnect.
12. Configure Your Battery Monitoring
If You Have a Victron BMV-712 or SmartShunt
You need to tell the battery monitor about your batteries by connecting to the device via Bluetooth with the VictronConnect app. The default password/pincode for Victron Smart devices when connecting via Bluetooth is 000000 (six zeros). Once connected click on the “gear icon” in the very top right portion of the screen and then click on the “Battery” row to open the battery configuration screen. You should be able to find these specifications in the documentation from your battery manufacturer. For SOK batteries, check here.
- Battery Capacity: total amp hour rating of your battery bank
- Charged voltage: varies with battery & manufacturer - see datasheet
- Note that this number should be about .2 or .3 volts below the absorption charge voltage set in your charging devices
- Discharge Floor: 10% (or, more conservatively 20%)
- The discharge floor is used to calculate the “Time-to-Go” or “Time remaining” info on the battery monitor. Lithium batteries can be discharged completely but it’s not recommended to go below 10-20%. By setting this to 10% or 20% instead of 0%, the battery monitor will change its calculations to provide for this “reserve” power. This value is also for triggering the relay at a certain state of charge (SOC).
- Tail Current: varies with battery & manufacturer - see datasheet
- Charged Detection Time: 3m
- Note, this setting, along with the “Charged voltage” above is what triggers a “synchronization” to 100% state of charge. In other words, if your battery bank gets to the “Charged voltage” setting for 3 minutes, it will be considered fully charged by the battery monitor and, from that point, it will track actual power consumed from the batteries (amp hours) to calculate the state of charge. This algorithm gets better after a few charge/discharge cycles.
- Peukert Exponent: 1.05
- Charge Efficiency Factor: 99%
- Current threshold: 0.10A
- Time to go averaging period 3m
- Battery SOC on reset: Keep SOC
- State of Charge: leave defaults
- Synchronize SOC to 100% button
- In normal operation you probably won’t use this feature. However, if you are certain your batteries are fully charged, but the normal charged detection mechanism isn’t working (a combination of the batteries reaching the “Charged voltage” setting for the length of time specified in the “Charged detection time” setting), you can press this button to manually “synchronize” to 100% state of charge.
- Zero Current Calibration button
- This option can be used to calibrate the zero reading if the battery monitor reads a non-zero current even when there is no load and the battery is not being charged.
Note: most battery manufacturers recommend that you make sure your batteries are fully charged at least twice per month which allows the battery monitor to synchronize to keep the state of charge calculations. This video has some great information.
If You Have a Lynx Smart or NG BMS
If you have the Lynx Smart or NG BMS, it means you’re using Victron's Smart or NG lithium batteries and, therefore, the system already knows almost everything it needs to about the batteries. You just need to connect to the Lynx Smart NG BMS via Bluetooth with the VictronConnect app. The default password/pincode for Victron Smart devices when connecting via Bluetooth is 000000 (six zeros). Once connected, click on the “gear icon” at the very top right part of the screen and change the 3x settings shown below in the “System settings” section.

13. Add Ruuvitag(s)
Ruuvitags (available in 3x versions with varying levels of waterproof) are wireless (Bluetooth) sensors that can provide temperature, humidity and other data to your Cerbo GX. We like to use one inside our van, one outside of the van, another in the fridge, etc.
The integrated Bluetooth connectivity on the Cerbo GX is not strong enough to support the Ruuvitag Pro so Victron recommends that you add a third-party USB to Bluetooth adapter. We’ve found this TP-Link model is affordable and works great.
Once you’ve connected the USB Bluetooth dongle, pull the plastic tab from the Ruuvitag to activate the unit with its internal battery. Next, open the Menu on the touchscreen and go to “Setting” and then choose “I/O”. Make sure that the “Enable” switch on this screen is turned on. After a few seconds, you should see the Ruuvitag you have powered on appear in this menu. Once it does, turn on the switch next to that device as well. If you’re adding multiple Ruuvitags, we recommend that you do one at a time so that you can write down each Ruuvitags unique ID and make a note of “where” you’ll be placing that particular Ruuvitag. This will help you give the Ruuvitags meaningful names in the next step.
Once you’ve added all the Ruuvitags you’ll be using you can rename them something meaningful. Start by reopening the Menu which will bring up the “Device List”. You should see each Ruuvitag listed here. To rename, press on the Ruuvitag you wish to name then press on “Device” and then press into the empty field in the “Name” row to bring up the virtual keyboard and type in the name you want to use.
You might also be interested in our blog post about how to trigger a fan controlled by the Cerbo GX relay with at a particular temperature as measured by a Ruuvitag.
14. Consider Customizing the Logo on the Cerbo GX Screen
This video details the process. In our experience, a 800 x 440 pixel image works well for aspect ratio/size. If you don’t get the aspect ratio right it squishes the logo. Also, we recommend using a background since transparent images don’t look good.
15. Consider Adding Tank Monitoring
If your rig has water tanks – fresh or grey – you might want to check out our tank monitoring blog post to be able to monitor your tank levels on the Cerbo GX.
16. Consider Adding GPS
You can add a USB GPS receiver such as this one to your Cerbo GX which is a really cool way of tracking the location of your van/rig. And, once you connect up your Cerbo GX with VRM (coming right up!) you can even configure a “geofence” area on a map and receive notifications if it goes outside of that area.
Connecting your Cerbo GX to VRM
1. Create a VRM Account
Start by establishing a VRM account for yourself on this page. These accounts are “free for life” from our friends at Victron! Once you register, they will send you a confirmation email that you have to open and confirm. Once you’ve confirmed, login to VRM.
2. Add Your “Installation”
Next, navigate to the “Add installation” screen in VRM. Then choose “Cerbo GX or Cerbo S-GX” option. You’l need to enter the “Installation ID” which is the “VRM Portal ID” you may have written down back in “step 7” above. If not, refer to “step 7” to find this information on your Cerbo GX. You can also name your “installation” on this screen. Once you’ve provided that information you can press the “Request access” button to proceed to the next step.
Note, if the Cerbo GX has previously been linked to another VRM account, and that “VRM Portal ID” and you try to “Request access” when establishing your new account/installation, the email address used the first time the Cerbo GX was added to VRM will be sent ane mail and you’ll see a message on the screen that reads “An email has been sent to the administrator adding new site”. The easiest thing to do is to have the original owner/account holder forward the email to you. If that isn’t possible you can reach out to your Victron dealer (which might be us!) so that we can try to manually override this for you.
3. Update Preferences
In VRM, click on “Preferences” in the left-side navigation (if you don’t see “Preferences” you’re likely viewing an “installation” so you’ll have to click on the “back” button at the top of the left-side navigation first). Next, click on “Display preferences” and configure the options on this screen to your preferences. We normally change “Units” to Fahrenheit and Gallons.
4. Enable Widgets
In addition to the main “Dashboard” report that shows much of the same information you’d see on the Touch 50 or Touch 70 screens, you can add a super wide range of “widgets” to the “Advanced” view in VRM. Widgets are basically domain/device-specific reports/charts. Below is a screenshot from the “Advanced” view in VRM showing 3x widgets.

To enable these widgets start by navigating to your installation by finding its name in the left-side navigation in VRM. From there click on “Advanced”. New installations do not have any widgets activated so you won’t see much there yet.
To choose which widgets you’d like to see, look for the “widgets button” near the top right part of the VRM interface. Below is a screenshot of this button.

That will bring up a list of the various devices in your system such as the “Gateway” (your GX device – the Cerbo GX), battery monitors, solar charge controllers, Ruuvitags, etc. Basically, anything that is connected to the Cerbo GX. You can then click on a device to reveal a list of available widgets for that particular device. Below is a screenshot showing some of the widgets for a Victron SmartShunt which I have renamed “Battery Monitor – AW Battery Monitor”. You can see that there are 7 widgets available and many of them are colored blue which indicates that they are active/selected. To add/remove a widget from a device menu, simply click on its name once to activate (shown in blue text) and click again to reactive (black text).
 Widgets can be reordered to suit your preferences. Also, as you scroll through the data in one report, you’ll see the various reports are linked together. Many of the widgets/reports can be made larger by clicking on the “expand icon” in the top right portion of the widget.
5. Enable Inverter/Charger Control
If you want to be able to change the “mode” of your inverter/charger (on, off, charger only mode, inverter only mode), go into your installation, navigate to “settings” and then “general” and toggle on the Inverter/Charger control as shown in the screenshot below.

6. Considering Sharing Access
If you purchased your equipment from us (thanks), you can take advantage of our world-class support including adding us to your VRM account so that we can help you troubleshoot remotely when necessary. Or, perhaps you want someone else monitoring your system for other reasons. Whatever the reasons, to share your system, navigate to that “installation” in the left-side menu by clicking on the “installation”/system name. Then click on “Settings” and then select “Users”. From this screen, you can use the “Invite user” button to invite a user. If you want to invite us, at Vanlife Outfitters, please share with our service department email address which is service@vanlifeoutfitters.com.

Victron also offers a "Share" link, but Vanlife Outfitters technical support can not use that method. Please use the Settings -> Users -> Invite User steps above to share access with support.
7. Consider Adding a Micro SD Card
Anytime your Cerbo GX has an internet connection, it will push the date from the system to VRM but if you’re offline this isn’t possible. You can add a Micro SD card to the Cerbo GX (built in slot) so that all this data can be stored locally and, when you’re back online, it will upload the data captured during that period!
Other Cool Stuff (for the Classic GUI only)
If you want to really go big and see tons more information/data on your Touch 50/70 screen you can add something called GuiMods which is pretty cool. This video details the process.
Note that the updated "New GUI" (really Victron, that's the best you could do for a name?) no longer supports GuiMods. The New GUI incorporates many of those powerful mods into the standard Venus OS release. Our recommendation is to make sure that the New GUI is running on your Cerbo. We think you'll like it!


