One of the questions we get often is “how should I approach this build” or “what do you work on first” and many other versions of this same question. I refer to this as the sequencing of the build. So, in this post I’m going to walk you through my step-by-step approach to converting an empty cargo van into a capable tiny home on wheels. I’ve written many other posts about these various steps so there will be plenty of links to those. It’s somewhat specific to my Miles Van Camper build and your specific layout or approach may require you to shuffle these around a bit but hopefully, this is helpful to anyone making their own camper van for the first time.
I’ve included 10 photos in at the bottom of the post that shows this transformation. I normally spend about three months on the process.
After building out many vans ourselves, Josh and Zach launched our store to help other DIY and professional van builders find the very best parts. We’ve done the work of researching (and road testing) the best products for camper vans so you don’t have to. Our catalog of products is carefully curated so you can have confidence you’re getting the best stuff for your van.
Phase 1: The Infrastructure
In my builds, it’s actually quite a while before there is any building at all…
1. Cutting Holes!
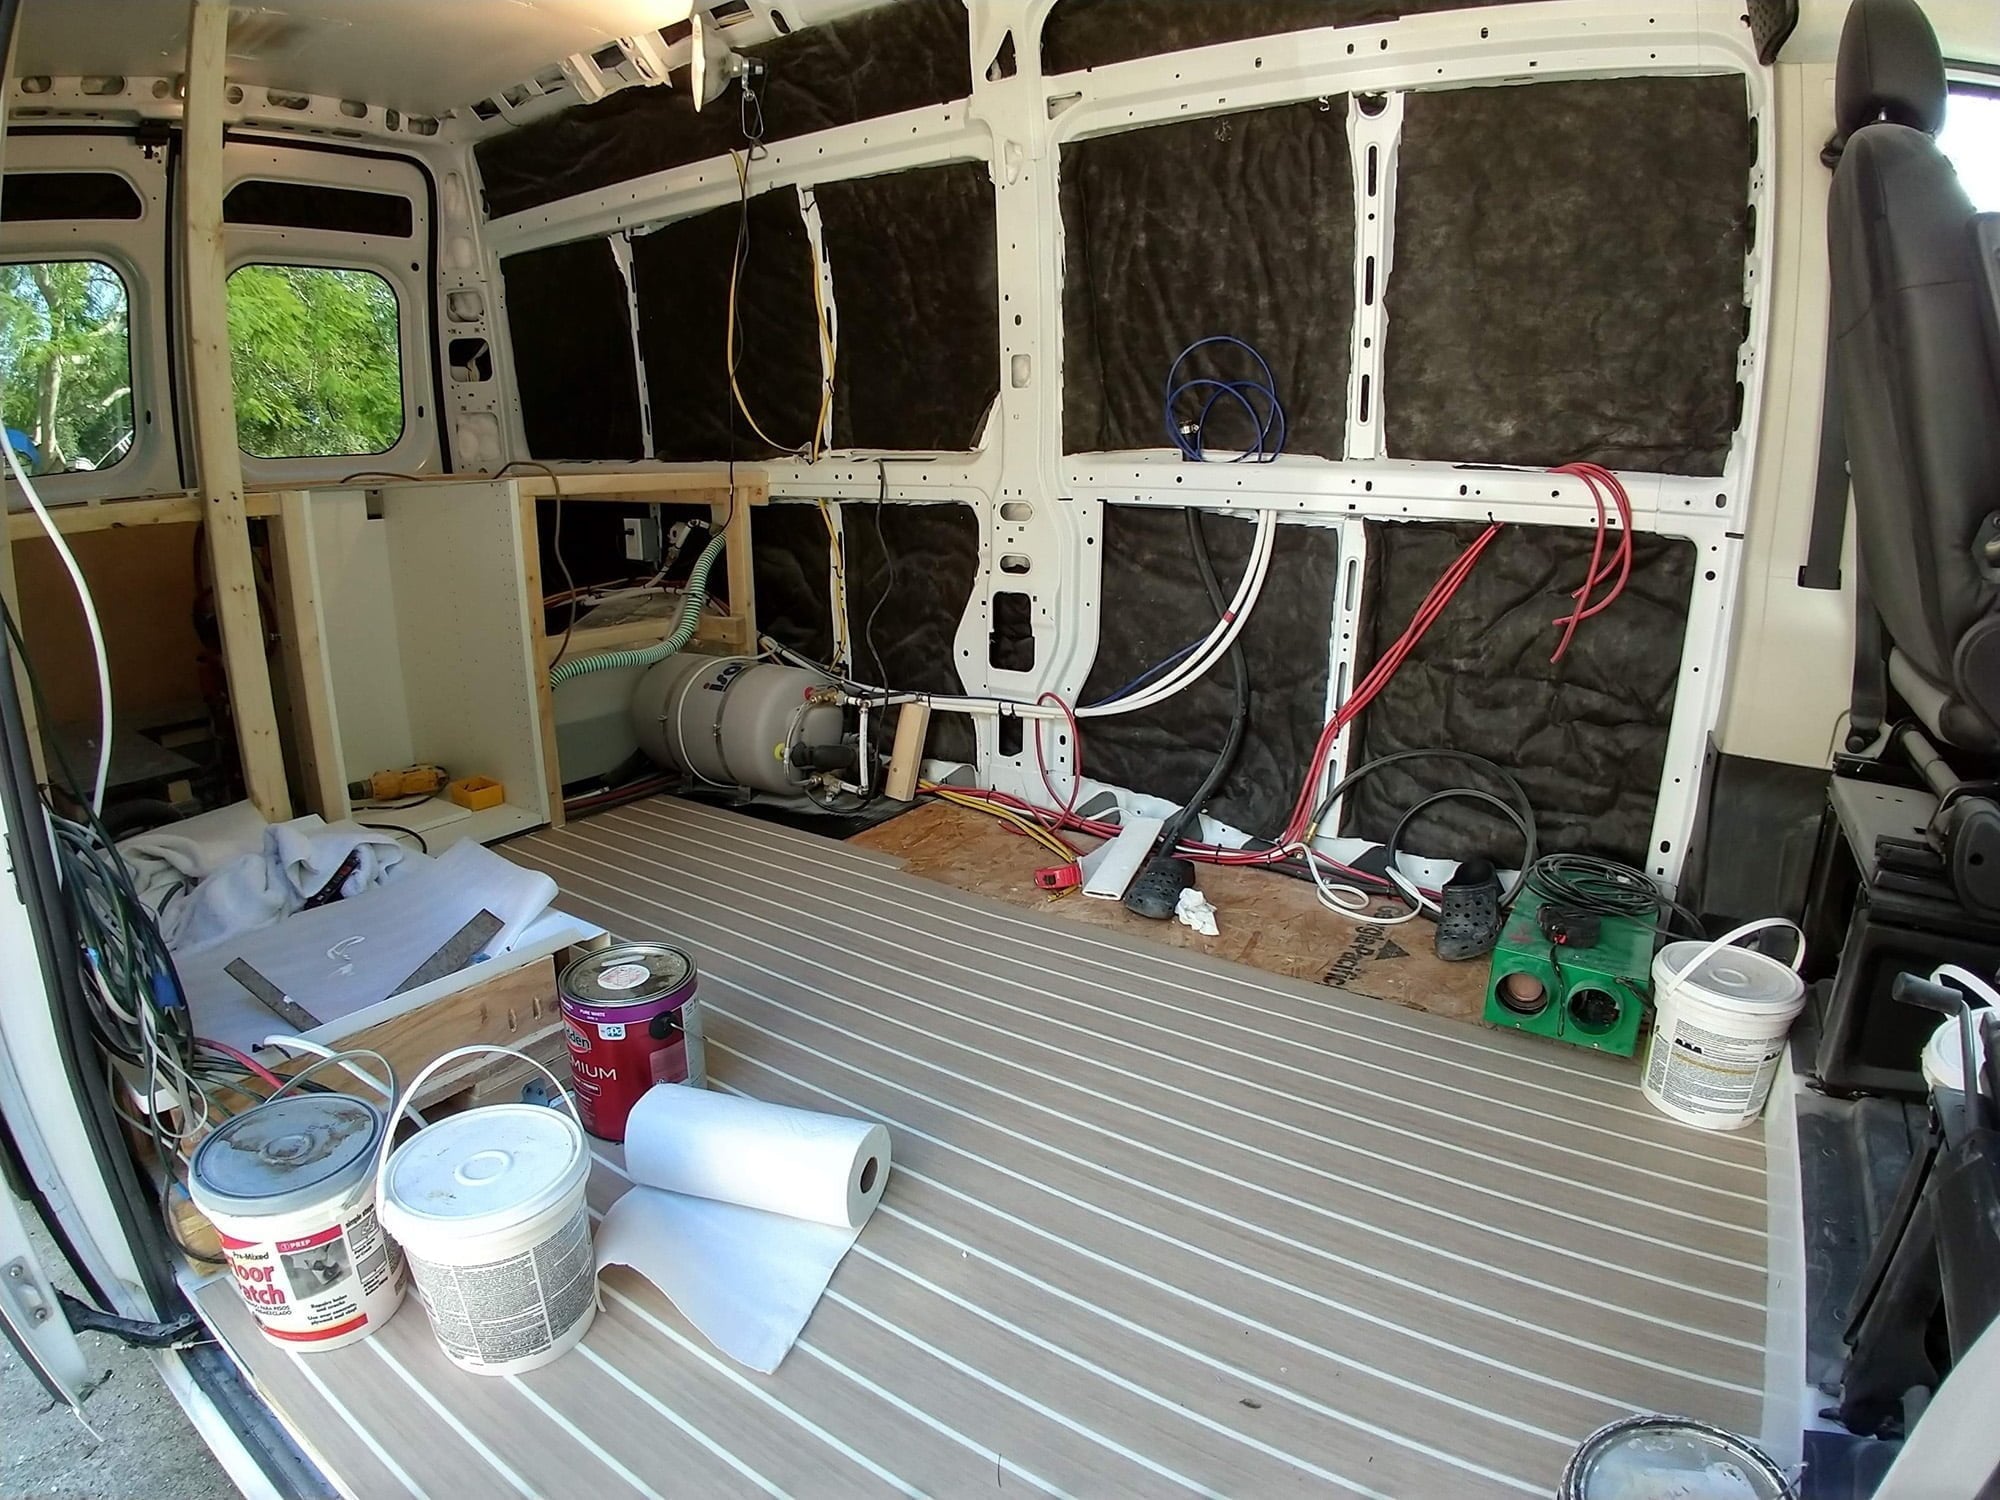
That’s a nice van you have there. Why don’t we start by cutting some giant holes in it! I like to jump right into the fire and start off the adventure with all the holes in the exterior of the van. For me it’s good to get this out of the way and, practically speaking, it’s much easier to clean up all the metal shavings when there isn’t anything in the van which you definitely want to do so they don’t stick around rusting away. By the way, there is another word for this stuff: swarf. Metal Swarf. I’ll be adding that to my ever-expanding list of rock band names. Anyway, in go the windows, vent fans, shore power inlet, water fill/city water inlet, and so on.
2. Grey Tank/Drains
The van won’t be getting any lighter (or higher off the ground) during the build and every millimeter matters when you’re spending a day underneath your van so I’ll tackle the grey water tank next. This is one of my least favorite projects. These days it’s easier with a Promaster because of our awesome Promaster grey water tank.
3. Shower Pan
Full-size showers/wet baths are controversial in camper vans – many think it’s a waste of space. Personally, it’s one of my favorite things in the van. Having a dedicated space to shower and do your toilet business in privacy is pretty great in my book. But, if you’re a pull-out-a-toilet-with-no-walls-around-it kind of person, you can skip right over this and wave to the other shoppers in the Walmart parking lot while sitting on your throne. At this point in the build, I will install my shower pan (on it’s platform) and plumb the drain into the grey tank. I like having this shower pan assembly directly on the van floor instead of on top of the subfloor to save that tiny bit of headroom. Plumbing the grey water tank vent is part of this process as well and requires yet another hole in the van. If you’re like me you’ll become increasingly comfortable with making holes in your van through the process – going from traumatic to just deeply uncomfortable.
4. Floor Insulation & Subfloor
I like to get the plywood subfloor installed early into my builds so this happens next atop some insulation on the floor. The subfloor makes it a lot easier to work inside the van compared to the factory metal floor with all the ridges and what have you.
5. Propane?
In my first two vans I used an horizontal, undermounted propane tank. Miles v3 didn’t need this since I switched to a Webasto gasoline powered heater instead the Propex propane heaters in the first vans. The tank was bolted through the floor so I wanted to get that done early in the process. I also rough in the gas lines to near where they will connect to the appliances.
6. Solar Panels
It’s helpful to get the solar panels up on the roof next before insulating everywhere. If you’re attaching your panels to a roof rack you might do this later in the build but I’ve attached my panels directly to the roof so I need to drill holes for mounting them with either bolts or plus-nuts and bolts.
7. Insulation
There are lots of ways to insulate your van but I prefer Thinsulate. It works great, easy to install and has a lot of other benefits.
Officially, we recommend installing Thinsulate with the white side towards the van sheet metal. This provides the best contact for resonance control of the metal panels. We also think this helps move moisture away from the skin should it occur there. Finally, the scrim (black part) helps keep dust/etc. out of the Thinsulate fibers when working through your build process.
Some builders will also add Low-E as we detail in our post about insulating a van.
8. Primary Electrical
Time to get the van juiced up! The “primary electrical” system is all the main components that make up the heart of an electrical system: batteries, inverter, solar charge controller and so on. It’s basically everything except the branch circuits (below) and the “loads” (things) they feed. I generally locate this underneath the bed area adjacent to the passenger wheel well. This step also includes connecting the van’s battery to a DC-DC charger for charging the battery bank when driving. If you’re daunted trying to design or install your electrical system, you’re at the right place. We have tons of great blog posts including example wiring diagrams. This page is a great place to start. We also have best price camper van electrical system bundles that will save you a bundle!
9. Rough-In Electrical System Branch Circuits
I typically use a combined 12 volt DC and 120 volt AC load center like this one. Branch circuits are the wires that run from this load center to the various “loads” like lights, a refrigerator, fans, etc. Each branch circuit has either a fuse (for DC loads) or a circuit breaker (for AC loads). At this point in the build, I’ll run these wires close to where they’ll eventually be “terminated” to the actual device/outlet/thing. I know what you’re thinking – where’s the link to purchase the wire? We got you covered… It’s always a good idea to use protection – wire loom in this case, anywhere the wire might interact with any sharp edges in the van. By the way, this gizmo makes looming wire a million+ times easier. I didn’t know about it until my third build and I sure wish I did. You should also leave a little “slack” at each location so you can fine-tune it later. Finally, consider using conduits in places that might be tucked behind walls or other things to make it easier to upgrade, repair, replace, or add wires in the future. By the way, we have an electrical accessory bundle here that is a great way to get things like wire, shore power inlet, load center, fuses, etc.
10. Ceiling Panels
I need to get the ceiling panels up before I move onto the next project of installing the air conditioner onto the roof. I always build a sort of frame to help support the weight of the air conditioner (see below). So that frame is built and then the ceiling panels are installed. The panels are made from 1/4″ luan type plywood that is eventually painted white. I need to add wooden supports/framing to fasten them to at the very front (just behind the cab area of the van) and at the very back in front of the rear cargo doors. Beyond that, they are fastened to the metal ribs of the van but, before I do, I use this foam tape on the ribs as a buffer between the metal and the wood panels. It’s both a small thermal break and a way to prevent any squeaks or rattles which I absolutely cannot stand. More on that later. Anyway, that foam tape is super helpful throughout the build. I also leave a small (1/8″ to 1/4″) gap between the wood panels where they meet. In general, I try to leave gaps between everything which are eventually covered up with some kind of trim or filled in with high-quality flexible caulking. In the case of the ceiling panels, the gaps get covered with trim material I make by ripping the same 1/4″ luan material with a table saw and then glue into place with silicone caulking. The whole idea here is to prevent stuff from smashing and rubbing against each other as the van travels down the road which would make irritating sounds.
11. Maxxfan & Rooftop Air Conditioner
I’m revising this post in 2023. These days there are lots of great 12/24 and 48-volt DC air conditioner options. My current van has the Mabru 12,000 BTU unit which is vastly more energy efficient, quieter, and nicer looking than the older-style, 120-volt AC options. We also have this comparison spreadsheet.
And, of course, every van needs a Maxxfan (or two). I prefer to have my AC unit in the front of the van and the Maxxfan in the rear, over my fixed bed. Even in the southeast USA, I tend to use the Maxxfan more throughout the year than the AC unit and it’s nice to have that right over the bed. Also, I don’t really like the AC blowing directly on me. Others have exactly the opposite preference!
12. Water Heater
Going back to my love for showers in vans, having hot water is the key to keeping the flame alive. So, at this point in the build I’ll install my Isotemp marine-style water heater and connect it up to the engine’s coolant lines. The love-fest continues… This is the very best way to heat water in a camper van! I wrote a post about this water heater and how to install one and compared it to the propane-powered on-demand water heater in my first van build. The short version is that it’s like magic. When you drive – even for a short period of time – your water is heated by simply driving and stays hot for a long time. So in love am I that we now sell these Isotemp water heaters and you can even purchase it with a van installation kit!
13. Webasto Heater
As I mentioned before I’ve used both the Propex propane heater and a Webasto gasoline heater. They both work great and are actually pretty similar in most ways but gasoline is much easier to find than propane and the tank is built right into your van (assuming it runs off gas). I wrote about my Webasto heater installation in this post. Probably even better, is this extensive video on tips for installing a Webasto heater. Another chance to get acquainted with the underbelly of your van!
14. Fresh Water Tank & Water Line Plumbing
The last major infrastructure project is putting in the fresh water tank and rough plumbing of the lines for all the faucets, etc. as well as connecting up the cold water supply and hot water outlet from the water heater. The water fill door was installed waaay back when all the other holes were being cut. By the way, I hope you’re recovering from the trauma of that by now. I recommend Pex for your plumbing and getting (or borrowing) good tools! We sell many types of freshwater tanks designed for cargo vans and after installing many different brands and types of pumps, this one and its associated accumulator tank are our favorites.
Phase 2: Building
Finally the “building” part of the build begins! Generally speaking, I’ll be working my way from the rear of the van toward the front.
15. Bed Area
My builds haven’t had the typical “garage” under the bed. Instead, there are two sets of drawers and a deep storage area that really helps keep things organized (here if you’re curious). Much of the infrastructure that has been installed is also located under the bed including the primary electrical system, water tank and lots of plumbing and wiring. The structure for the bed/loft area is a combination of the IKEA drawer units and wood framing.
16. Shower/Wet Bath
Have I mentioned yet how much I love my shower/wet bath? I’ll gush a bit more. I have been traveling in camper vans for quite a long time…well before I had my vancy Promaster. Over the years I owned (and tweaked) three VW camper vans. Each was amazing but none of them had any sort of bathroom setup. There was no space and, in my first Westy, it probably would have reduced the top speed from 55 MPH to 35 making it even more terrifying to be on roads with modern vehicles. Anyway, when the Promaster showed up in my driveway, it was clearly big enough (and well powered enough) for this major upgrade. A clean, private hot shower anywhere you can take your van is a true luxury. OK, OK, enough already. You can read about how I made my wet bath here. If you want a shower but not a dedicated space, you might want to check out this folding shower option.
17. Front Wall Of Shower & Panels
With the shower complete (I won’t say a thing) I can install all the panels on the front wall. That includes the inverter control panel Cerbo GX with Touch 50 screen, SeeLevel tank monitoring system. Some folks will also have various switches for lights, etc.
18. Flooring
I like to wait as long as I can to put in my flooring so that I don’t have to bother with trying to protect it. For me this is a good time to install it. I’m far enough along but before I continue building stuff. I used Lonseal marine vinyl flooring in my last two builds – specifically the “Antique & Ivory” style. This product makes for a very durable attractive floor without any cracks or seams for dirt and water to get trapped into and it’s easy to keep clean too! Lonseal comes in 6′ wide rolls which isn’t enough to span across the van from driver to passenger side. In my case the galley cabinets cover the area where the flooring didn’t reach but you can seam two pieces of Lonseal together. I really love this flooring but not quite as much as the shower.
19. Refrigerator/Microwave Cabinet
Next I turn my attention to the cabinet that houses my large refrigerator/freezer and microwave which is across the van from the wet bath on the driver side. The bottom of this cabinet has a door that allows access to the Isotemp water heater. I use IKEA cover panels to “skin” this cabinet so that it matches the finish of the IKEA cabinets which is next…
20. Galley Cabinets
Next up is the installation of the IKEA galley cabinets. I’ve used them in three vans and they hold up remarkably well with some basic modifications. And, if you happen to screw up a drawer front (or other piece) you can stop at the next IKEA and replace it easily with minimal tools. I wrote a post about using IKEA cabinets in a camper van.
21: Wall Panels
With most of the building blocks in place, I can now install all the wall panels. Like the ceiling panels, these are made from 1/4″ luan type plywood which is painted a color very similar to the plastic trim in the Promaster cab. The wall panels curve inward where they meet the ceiling panels which I think looks really nice and this material is just flexible enough to accomplish this curve while being strong enough to maintain its overall shape and feel sturdy. Rather than install wall panels toward the beginning of the process, I do this now so that I’m only covering areas that are visible in the build. For instance, there are no wall panels below the bed area or behind the galley cabinets. This reduces effort, materials and a little bit of weight. It also allows for the walls to remain partially open so that they can breathe. Making templates for all these panels can be crazy making but it’s worth the effort to get them shaped correctly. Many of my panels also have cut-outs for outlets and lights which certainly adds to the complexity.
22. Painting
This is the moment everything seems to come together and start looking much more finished. All the wall and ceiling panels are painted, sanded, painted again, etc. It really is amazing what a coat of paint will do!
23. Lagun Table & Top
Somewhere it is written that every camper van must have a Lagun table mount. See what I just did there? I wrote it… Anyway, mine is mounted on the side of the galley cabinets so when the cab seats are swiveled around the table can be used for eating and working. When not in use it swings out of the way over the top of the galley counter.
24. Cassette Toilet Installation
Easy peasy. The Thetford Curve cassette toilet (er, Porta-Potti) can be purchased with a mounting plate which makes this job super easy and enables you to remove the toilet quickly for emptying, cleaning or an even more luxurious shower. How does it work? Way better than you’d ever expect actually. If you put in the proper chemicals and empty/clean it regularly you won’t smell anything even if you do the taboo number two. More on the toilet and recommendations on where to empty it in this post – toward the bottom. No pun intended.
25. Seat Swivels
I like to save the installation of the seat swivels for the end. It’s a refreshingly easy project and I have the seats covered with large garbage bags for most of the build. In my first two vans I used the Sportscraft swivel but switched to the CTA swivel in the third build and I prefer it. These days (again, updating in 2023) I prefer the Scopema swivels which are the tried-and-true brand of aftermarket seat swivels.
26. Trim & Details
The build wraps up with all the little details and trim work. Everything from cabinet hardware to cleaning and fine trim work.
Phase 3: Shakedown Trip & Slaying Rattles
A camper van is never really done but, at this point, it’s ready for the maiden voyage which is often referred to a “shakedown” trip. So, it’s time to move in and hit the road for the first time. I have a post about some of the awesome things that go inside the van and are worthy of the space they take up.
Even though I do everything I can throughout the van build to minimize any squeaks or rattles inevitably there are a few to hunt down during the shakedown trip. I am pretty much obsessed with a quiet ride so this process typically involves my girlfriend driving and me wandering around the van like a mad man listening for tiny annoyances that it’s likely only I would notice and then fixing them. Sometimes, we’ll find a bumpy road or gnarly parking lot for this purpose.
Normally, there are other small things to repair as well. So, I do what I can on the trip itself and keep a punch list of items to fix or improve when I’m back to where I have the right tools.
Given how careful and perfectionist (blessing and a curse) I am during the build process, I can’t imagine what kind of build quality issues you’d have with a factory-built rig like a Winnebago.
Anyway, it’s been my experience that even the best built vans need some fine tuning.
Thanks for reading. One more thing about the shower… just kidding.


