This post was originally written in early 2020, and it documented a Webasto installation process from the summer of 2019. We highly recommend that you check out our newer installation and tips video post here.
This updated version of the article starts below with a “preamble” of all the stuff I didn’t know and then dives into how to install a Webasto heater into a Promaster van. You can jump to that section if you want to skip the preamble. There is also an installation tips and advice section that you can jump to.
We Started a Web Store and We Sell Webasto Heaters
In late 2020, we launched the store here on Vanlife Outfitters. The goal of the store is to help DIY van builders by selling the best products available at reasonable prices, and obviously, one of the best things for a camper van is a Webasto heater!
But, why would you buy from us instead of purchasing the heater from Russia for half the price? I’ll give you some context on that in this preamble and let you decide for yourself. Again, you can jump right into the actual installation if you’d like.
As part of launching the store, I set out to find an authorized distributor for Webasto products and discovered VMACS (short for Virgina Mobile Air Conditioning Systems). They have been selling and supporting Webasto products for 20 years. I could tell immediately how knowledgeable Scott at VMACS was about the products, and he was also excited to support the vanlife community! By partnering with VMACS we can not only offer you the entire line of Webasto products (in-stock for quick shipping), but also back that up with the absolute best service from true experts during your installation and service/advice when you’re out on the road with any issues. More on warranty service below.
We also felt that there was a lot of room for improving the buying experience. Purchasing a Webasto heater was way too confusing. The information presented by retailers seemed to be coded in “Webasto-speak,” nothing was consistent or clear and the descriptions were filled with part numbers that had to be deciphered. So it was always a mystery what you’d get in the box which was exaggerated by the wide variances in pricing that left you guessing why one thing was so much more expensive than another. Especially if that one thing was from Russia. More on that later too. Then there was the issue of trust and service. Who could you buy from that you had confidence would support you and understand the camper van customer?
We think we’ve addressed these “pain points” with our store and the partnership we have established with VMACS. We have developed kits specifically for vanlifers converting Promasters, Sprinters or Transit vans. Each kit has is clearly described and details everything that comes in the box. We’ve also added other Webasto parts that are compatible with the Air Top series heaters including ducting, vents, digital controllers, etc. to help you complete your installation with ease.
All The Things I Didn’t Know Could Fill A Blog Post!
Working with Scott at VMACS sure opened my eyes! So much of the information about Webasto heaters on the internets is either entirely or partially incorrect and I’m afraid my blog was no exception.
However, to be fair, Webasto does a lousy job of communicating and there are very few Webasto distributors who are really focused on the vanlife community. So, a lot of well-meaning folks (like me) have been perpetuating myths. We’re going to be doing our best to get reliable information to the vanlife community and updating our content as we learn things!
High Altitude Information
The Air Top 2000 STC is Webasto's smallest heater which is a great form factor for a camper van and is generally plenty powerful to keep you warm (2 kilowatt heating capacity). However, the small burner on these heaters is susceptible to excessive carbon build up - particularly the gasoline models. Webasto has designed the heater to work optimally up to 4,900 feet altitude.
If you're going to be spending a lot of time at higher elevations you should consider the Air Top 2000 STC (Altitude Adjusted gasoline or diesel) heaters that has been professionally pre-adjusted to work at up to 6,400 feet, or even the larger EVO 40 heater (4 kilowatt heating capacity). The gasoline EVO 40 can be used at up to 7,200 feet, and the diesel EVO 40 can be used at up to 18,000 feet! The EVO 40 is physically larger and therefore has a larger burner chamber, which reduces the risk of carbon buildup issues, and it has "automatic" altitude adjustment capability.
So, while the Air Top 2000 STC will work at higher altitudes for shorter periods of time, Webasto does not recommend it and, if you do, you should run the heater at "full load" (turned up all the way) when you return to lower altitudes for at least a few hours in order to try to clean out the burner chamber.
Want to learn more? Please check out this post for more information.
We also recorded a one hour video interview with a Webasto tech that has a lot of great information. You can watch the full video or use this link to jump to the part of the video where we discuss using an Air Top 2000 STC at altitude.
High Altitude Mode “Hack”
In my original post, I wrote about how to put a Webasto heater into this mode. If you’re interested, I kept the procedure below. But, what I didn’t know is that Webasto doesn’t actually recommend doing this because it’s almost never necessary and you can’t do it “correctly” (according to approved procedure) without using a Co2 meter and the having training to do so. If you’re curious, here’s a PDF of page 603 of the Webasto Air Top Workshop Guide that details the official procedure for high altitude mode. Importantly, it states that you should be making that adjustment when you’re at the specific altitude you wish to calibrate for rather than an arbitrary adjustment. In my case, I was setting the “high altitude” mode at sea level in Florida, which is pretty funny in hindsight.
Why Were We Doing This?
People (like myself and Far Out Ride) have recommended fiddling with this “high altitude” mode to minimize carbon build up. However, my current understanding is that this isn’t necessary under normal operating conditions. In fact, without proper calibration, it’s possible that “hacking” the high altitude settings might actually backfire and result in more carbon build up. There are other tips such as running the heater at “full load” for long periods of time, which delivers the highest airflow through the combustion chamber to help blow out any carbon.
What About The Russians?
When I ordered my Webasto Air Top 2000 STC from Russia back in 2019, did it come with love? Well, kinda.
The heater shipped quickly and arrived in brand-new condition. I installed it and have used it for over a year with no issues at all. So, the experience wasn’t bad at all and the unit was a genuine Webasto. No problems so far.
However, I always wondered how Heaters4You could sell these for less than half the price of anyone else. Back then, I was too busy building a van to find the answer, but now that I’m working with a reputable USA distributor and know what’s going on, the answer is too important not to share!
So, let me break it down starting with how it affects you – the van builder – and then get into the unfortunate consequences this has on legitimate Webasto dealers.
What’s Wrong With The Russian Kits For Van Builders?
First of all, you’re not getting the same stuff you would in a North American kit. As I wrote before, one of our goals is to make it more clear what you’re buying by decoding the confusing Webasto product line-up and detailing everything as much as possible in our store. Going through this process I found the following differences between what I received in the Russian market kit from Heaters4You and what is supplied in the proper North American kits we sell. By the way, here’s a detailed video comparing what is included in the Russian heater box versus the North American box.
- The air intake hose I received was plastic instead of the aluminum hose supplied with the North American units.
- The North American heaters do not come with the black plastic air intake silencer, but my Russian heater did. This along with the combustion air silencer are available in our installation kit add-ons.
- My heater did not include a fuel filter! In hindsight this seems so important and I will be ordering that and installing it where it belongs – just after the fuel port/pickup inside the Promaster fuel tank access panel. That's another $20-something.
- I also did not receive the standard mounting plate that comes with the North American heaters. I ended up purchasing one which is quite similar, but actually makes the installation a bit more difficult. If you buy a North American kit you get this mounting plate ($25) and this foam gasket ($20) that seals the plate to the van floor.
- I received the “old style” fuel pump mounting bracket, which is a rubber coated metal bracket that tends to transfer the “ticking” sound that the fuel pump makes when running more than the newer style ($15) which is all rubber except for the mounting hole making it quieter.
- The wiring harness in my kit was visually different and did not have any wire loom.
All that adds up to about $90 in missing parts but some things, like a missing fuel filter, could cause you other headaches.
The other potential problem is that many of the North American components are not compatible with the European/Russian units. Some examples:
- European heaters have different programming than North American heaters making all digital controllers partially incompatible or completely incompatible between European heaters and North American heaters
- European heaters have different wiring harnesses than North American heaters making it impossible to physically connect North American Accessories including some controllers
- The Multi-Control for Air Heaters is specifically a European control, therefore replacements of any wiring harnesses connecting to a Multi-control or replacement Multi-Controls controllers must be obtained from a European source.
- Russian heaters are frequently packed with the wrong wiring harness for the control upgrade to a Multi-control
I would love to hear from you if you ordered a Russian kit and had a different experience or received different parts that what I described.
No Warranty
Example of the serial number sticker of a Russian Webasto unit.

I knew that buying from Russia meant that my heater wouldn’t have a warranty in the USA. In fact, it says as much right on the serial number sticker. However, at the time, I had heard that Webasto warranty service wasn’t that great AND I could literally buy two units for the cost of one single North American one. The latter is still true (with the caveats), but it turns out that having a warranty is more valuable than I thought if you buy from the right distributor.
Not All Distributors Fully Support DIY Installers
I think the reason I had heard Webasto warranty service wasn’t great is because not all authorized distributors are willing to fully support DIY installers. There is a myth on the internets that if you install a Webasto heater yourself it will void the warranty. That’s not true but it may be sort of effectively true if you buy from some distributors.
Many distributors are reluctant to support DIY installations because it’s difficult and risky. It can be really hard to troubleshoot issues with DIY installations that vary so widely and might have been done incorrectly. Also, any replacement parts sent out under warranty come from that distributor’s stock and they are only reimbursed if the customer sends back any faulty parts – which doesn’t always happen – and, even if they do, it can take more than a month for Webasto to complete these claims.
If you buy from us (fulfilled by VMACS), you can be assured that you’ll be fully supported as a DIY builder. Since that is our primary customer, this was critical to us and one of the reasons we didn’t want to become a Webasto distributor directly.
They maintain a significant amount of products and replacement parts in-stock. If you experience a problem with your Webasto unit within the warranty period, they will work with you to determine the cause of failure and will either attempt to give instruction on how to correct any faulty workmanship or supply a replacement part. If a replacement part is needed they will send you the part immediately from their stock at no charge so that you can get up and running as quickly as possible. Of course, they rely on you to return any faulty parts in order to be reimbursed for the warranty repair. Not all Webasto distributors won’t do this.
So, How Can The Russians Sell Them So Cheap?
Well, nobody really knows for sure. But, here’s my take on the situation based on the little bit I know. None of this is official of course, I’m just reading between the lines.
Webasto must offer distributors in Russia very low pricing…So low that they can actually make a profit reselling the units they receive for the prices you see (about $560 last I checked). But, what I do know is that they are specifically prohibited from selling these outside of Russia which, of course, they are doing at volume. So, that’s pretty shady. Will Webasto eventually trace these Russian units that are “leaking” into the so-called free world? Maybe?
The Russian Impact On Local Dealers
Pretty simple: they’re getting screwed by a wildly uneven playing field. A legitimate North American distributor’s wholesale cost (when purchasing at huge volumes) is more than Heaters4You is selling them to end users. It’s literally impossible for them to compete on price so they are loosing a lot of business unfairly. These distributors are typically small, locally owned businesses and this impact is very real for them.
Bottom Line
At the end of the day, the truth is that it does cost twice as much to buy a Webasto heater from a proper North American seller like ourselves. So, if all you can afford is the Russian units, I totally understand. In my view, a real Webasto heater, even from Russia, with all the caveats, is still a better option than a cheap Chinese heater, which are rife with all kinds of issues – some of which could kill you. But, if you do have the means to buy from a North American seller I would highly encourage you to do so.
What About Amazon?
We all love Amazon and fast Prime shipping, so what’s the deal with them? If you do a search from the USA on Amazon for Webasto Air Top 2000 you’ll likely see some knock off Chinese heaters and then a bunch of genuine Webasto stuff but all from poorly rated sellers and ones like Butler Technik.
This means that you’re getting a European unit that is not compatible with many of the North American parts just like the Russian kits. See the photo below where I have highlighted with a blue outline the MultiControl controller in their kit and the bullet point about how they are a UK distributor. And what exactly does the phrase “genuine UK dealer guaranteed replacement heater” mean?
You will have a valid warranty but any support or parts will have to come from the UK through them (Butler Technik) and you won’t be able to have any service in the USA because of the compatibility issues.

OK, Finally… The Installation Part
In my first two builds (Miles v1 and Miles v2) I used a Propex furnaces and with a under-mounted propane tank. These worked great but, I wanted to eliminate the propane tank from my third build (Miles v3) to simplify things.
What I Used
My heater system is based around the Webasto Air Top STC. This heater comes in both a diesel or gasoline (petrol) version. Since my Promaster uses gasoline I used the gas version.
Recommended Parts:
- A Webasto Air Top 2000 STC heater plus the fuel line tapping add-on for either Promasters/Sprinters or Ford Transits. We also recommend the intake and exhaust silencer add-ons.
If you read the preamble to this post, you’ll see that I purchased my Webasto from Heaters4You because I didn’t know any better! That required me to purchase some extra parts separately like a mounting plate. The North American kits we sell come with these things.
- 2x – Webasto 60mm louvers/vents. I wanted these for the cabinet that Webasto is installed; one for air inlet and another for the heated air outflow. You may not need these.
- 1x – meter of 60mm ducting that connects the heated air outflow to the louver/vent.
- The kits above come with the standard rheostat-style controller. If you want to have a digital controller that can be programmed you might want start with a kit with a SmarTemp controller. Or upgrade your existing air hear, and we include this as an option in ours store. Note that many of the Russian/European Webasto units are sold with a MultiControl controller. This is NOT compatible with the North American heaters. So the only “upgraded” (digital) controller is the SmarTemp controller. Conversely, if you have a European/Russian unit you cannot use the SmarTemp controller. Another great feature of the SmarTemp controller is that it has a temperature sensor built in. More on that below…
Temperature Sensing
The rheostat-style controller included with the Webasto Air Top 2000 STC heater does not have a temperature sensor in the controller. Instead, the heater itself has a temperature sensor located in the cool air intake. Since warm air rises and most people install their Webasto onto the floor of their van, the built-in temperature sensor is monitoring the considerably cooler/lower air. So, you might consider adding the remote/room temp sensor that can be located wherever you want the temperature to be monitored. Installation is simple – it just plugs into a connector on the heater unit’s wiring harness. If you upgrade to the SmarTemp controller it has a temp sensor built in so you don’t need a remote/room temp sensor.
Installation Guide
Other Parts You Might Need For Your Installation
We also sell a variety of helpful installation parts including ducting to mounting plates. If you plan on having more than one vent/louver from your heater's hot air outlet, you may want some "T" or "Y" fittings or ducting. This PDF file illustrates all the parts available from Webasto for this purpose which we can special order for you and you can check out our ducting/vent configuration tool.
Anytime you’re using a combustion device like a Webasto heater or others, I highly recommend installing a carbon monoxide detector in your van. I normally use something like this one that is also an propane gas detector.
Location
The Webasto is installed in the same place that I put my Propex heater in the first two builds – directly behind the driver seat on the floor.
The Webasto Air Top STC manual makes it clear that there needs to be an airtight seal between the bottom of the heater and the surface it’s attached to. I wanted to install the heater directly on the metal van floor rather than the plywood subfloor. So, I cut out a section of the subfloor for the heater. However, the van floor is NOT flat in this area – there are the structural corrugations in that spot which is where the mounting plate comes in. In addition, the bolts that come with the Webasto to mount it to the surface are pretty short. Also, I wanted a way to remote the heater from inside the van with relative ease if (when) it needed service. So, I decided to fasten the heater to the mounting plate and then attach the mounting plate to 1″ tube steel that I painted black.
NOTE: had I received a North American heater it would have come with this mounting plate that couples up with this gasket to seal with the floor – even if it is uneven like the spot I located my heater. It also comes with longer bolts. So, this part of the installation would be much easier.

That assembly or “sandwich”, from top to bottom, is made up of the heater, the rubber gasket, the mounting plate and then the tube steel.
You can see that the mounting bolts for the Webasto are “below” the bottom of the tube steel. This allows the entire assembly to be fastened through the van floor with 4x screws that are placed on the far edges of each piece of tube steel. This means that, if (when) I need to pull out the heater, I can remove the clamps holding the heater’s combustion air hoses, disconnect wiring and the fuel line from below, remove the screws holding the assembly to the floor and then pull that entire thing up.
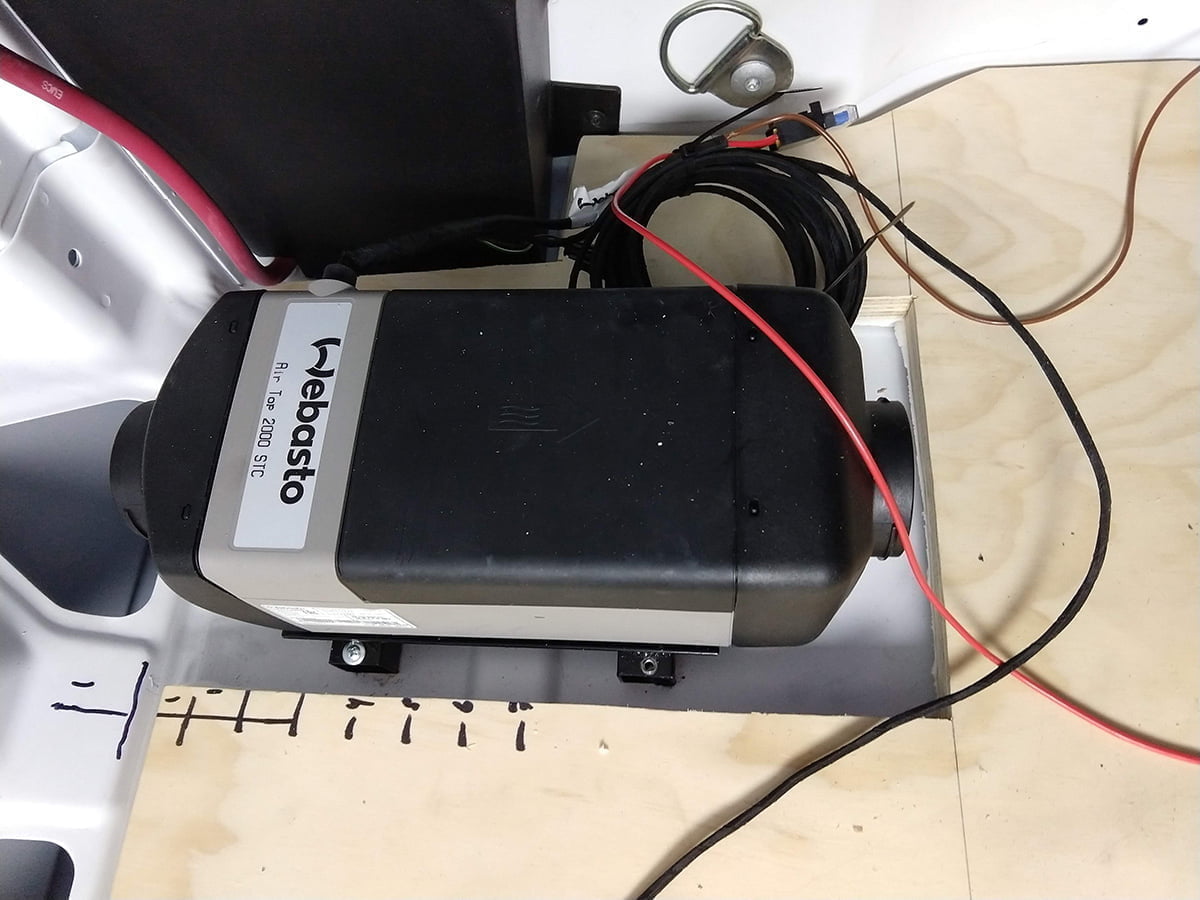
Inside The Van
Below is a photo of my installation from above. You’ll see the heater itself mounted on the metal van floor using the mounting plate (details above). Eventually, I would box this in so that it sort of lines up with my galley cabinetry.

Below The Van
Pictured below is what this all looks like from underneath the van. In this photo you can see the combustion air intake hose with it’s “silencer”, the combustion air exhaust hose and the fuel line and fuel pump for the heater.

Once I had the heater “assembly” (above) built, I attached the combustion air intake (plastic hose) and combustion exhaust (stainless steel hose) to their respective connections on the bottom of the heater. I chose to add some high-temperature silicone on these connections to ensure they are full sealed and that no combustion exhaust leaked into my van.
There is some wiring that comes out from combustion air intake connection and a “slot” in that connector. This wiring connects to the fuel pump and the slot allows you to route the wire “outside” of the intake hose itself. It’s an odd setup.
Below is a photo of the connections on the bottom of the Webasto heater.

Next, I prepared to mount the heater “assembly” including the hoses to the floor. The Webasto comes with a paper template for locating where the holes should go including the combustion air intake and exhaust hoses, fuel line connector and the 4x mounting bolts. Since I was not using the 4x mounting bolts (heater was already mounted), I marked the locations for the holes which were the combustion intake and exhaust and fuel line. In addition, I marked another hole location for the wiring that would supply power to the fuel pump which I put directly adjacent to the combustion air inlet hole since this wire comes through it’s “slot” in that location.
Once marked, it’s a good idea to double check that the heater will fit in the spot you want to put it before you drill those holes! I also recommend drilling a small “pilot” hole in the center of one of the combustion hose locations so that you can go below the van and “see” where these hoses (and the other connections) will down there so that you can make sure there is adequate access. I confirmed all of this and then drilled each of these 4x holes in the van floor. This was difficult at times since a few of the hole locations “spanned” a floor rib.
With the floor holes drilled, I was able to push the combustion intake and exhaust hoses through the floor and drop the heater “assembly” into place on the metal van floor and screw down the entire assembly from above through the tube steel.
Next, I moved onto the gasoline fuel line. Very conveniently, there is a built-in auxiliary fuel pickup on Promaster vans! To access this port, you remove the floor panel that is between the seats in the cab. Underneath this panel you’ll see something like the following.

There is a sort of “cap” on the auxiliary pickup that comes off easily enough. From there it’s simple to “snap on” the Doorman Fuel Line Connector.
The Webasto kit that I ordered came with fuel hose and some slightly larger sections of hose that the smaller fuel hose can slide onto. These larger bits of hose act as “couplers” and one of these can be used to connect the outlet on the Doorman connector to the fuel line. The kit also included plenty of clamps. From there, the fuel hose curves around the front section of the fuel area and then down below the van toward the pump. This area is “open” to the elements so there is no need to drill any holes and the hose is rigid enough to simply poke through this area from the top and then be able to find that hose from below the van to pull it into the location where you’ll be installing your fuel pump. I ran the fuel hose inside blue, 3/8″ plastic tubing that I had leftover from another project which serves as a sort of conduit to protect the fuel hose itself.
At this point I spend some (more) time under the van!
First I chose a place for the fuel pump and installed it. The kit comes with a clamp for the pump and I used a #10 stainless steel self-tapping screw to fasten it to a support beam.
Then I routed the fuel line to the pump and also connected the pump’s outlet to the fuel inlet on the Webasto itself. I decided to “prime” the fuel line that ran from the van’s gas tank down to the Webasto pump. I did this by simply sucking on the fuel line until the gas flowed out. Try not to do that. Gasoline is a horrible thing to have in your mouth! I also routed the fuel pump’s electrical wires to the pump. All of the fuel lines and wires are protected in wire loom.
Next, I mounted the combustion air inlet “silencer” that was provided with the kit, cut the plastic hose to the correct length and connected it to the silencer.
Then I routed the stainless steel combustion exhaust hose away from the heater and to the driver side of the van. It is important that there are no low points or dips in the path of this hose where water from the exhaust vapor can collect. If there are low points, it’s recommended that you drill a 3/16″ hole at the bottom of the hose at each low point to let water escape. I tried to route my hose so that it sloped evenly down to the side of the van. You also want to create a downward bend in the hose where it meets the van sidewall as shown below.

Note: you should make sure that there is some distance between the combustion air intake hose and the combustion exhaust hose and that these face away from each other.
With all the hoses and wiring routed, I sealed up all of the holes from below the van. I sealed around the combustion exhaust with High Temperature RTV Silicone and the other holes with Loctite Marine Sealant. When the sealants were dry, I sprayed them with grey primer.
Back inside the van, I turned my attention to wiring up the heater. The gaggle of wires that come with the Webasto seem very confusing when you first encounter them. Or at least they did for me! However, once I began laying out the wires in the relative direction they were going to go (i.e.: toward the fuel pump, up toward the rheostat controller, etc.), the wiring harness started to make more sense and since each connector is unique it made it easier to determine which “lead” went to which device/part.
Once I had a sense of how the wiring harness worked, I removed the access panel from the top/front of the heater to connect up the main, 18-pin electrical connector to the corresponding connection inside the heater.
Then I connected the analog, rheostat-style controller that came with my kit to the cable that extends from the wiring harness. The wiring for the controller is sufficiently long to place it pretty much wherever you’d like it. In my case, the controller was mounted just above the heater, behind the driver seat a bit forward of my galley area. None of that stuff was installed yet so, at this time, I just laid the controller on the driver seat.
Finally, I connected up 12VDC power wires to a temporary supply cable that I had run from by battery bank. On the Webasto wiring harness, the red wire is positive, brown is negative and it comes with a built-in fuse. To wrap things up, I also put on the plastic protective “screen” that covers the air inlet on the “back” side of the heater (opposite the hot air outlet).
Turning It On
Yay! The moment of truth! With everything seemingly ready, I turned the knob on the rheostat all the way to 11. It was summer in Florida (a million degrees) so I wasn’t sure it would turn on at all but it seems that the turning the knob up to 11 (all the way to the right/fully clockwise) forces the heater to turn on even if it is summer in Florida.
When first powered on, the Webasto turns on the fan at a slow speed and then, after about 30 seconds or a minute (never timed it), you can hear the pump engage (making a clicking sound) and shortly after that the heater should turn on with the fan increasing in speed once there is combustion. Notably, whenever the heater is “on” and regardless of where the controller’s rheostat knob is set, the fan will run at low speed constantly.
When I turned on the heater I heard the fan and eventually the pump engage but it did not start. So, I turned it off and then on again to repeat the sequence. I did this about three times and eventually it stopped running and the green LED on the controller knob started flashing indicating that there was a fault. Below is a screenshot from page 75 in the manual that details the various faults and how to read them. Basically, when there is a fault, that green LED on the rheostat-style controller will blink 5 times quickly and then will come on for a series of longer flashes. In my case there was one of these longer flashes which was the pattern for the “no start (no flame formation)” fault. That pretty much lined up with my theory that the gasoline wasn’t making its way to the heater. To “clear” a fault, according to the manual you, “briefly switch the heater on and off (at least 2 seconds) to reset fault lockout”. I did this and after another attempt, the heater actually fired up and hot air starting coming out!
High Altitude Mode “Hack”
High Altitude Mode & Why I Recommend It For Everyone
I have intentionally re-characterized this as a “hack” because of the reasons I wrote about in the preamble of this post. I don’t actually recommend this anymore however, I’ll leave this here for anyone who wants to know the procedure but do take it with some grains of salt. If you want to know about the actual factory recommended procedure and have a C02 meter handy, here is a PDF of page 603 of the Webasto Air Top Workshop Manual that details the process.
Note: you need the standard, rheostat-type “controller” to put the heater in “high altitude mode”.
So, here’s how to do it:
In the main wiring harness, there is a wire that you need to “ground” in order to change the mode. It seems that Webasto changes the colors of their wires sometimes so, from the main wiring harness (that connects up to the heater), you should look for a two-wire “pigtail” with either a brown and green wire or a red and gray wire (mine was the brown/green combo). It’s pretty far down the wiring harness – far away from where the harness connects to the heater. Once you find that proceed with the steps below.
- First, you’ll want to connect the brown (or gray) wire to “ground”. For example, you’d take a length of cable that is temporarily spliced/connected to the brown (or gray) wire and connect the other end to either bare metal on the van (ground) or the ground terminal on your van or camper battery.
- Turn on the heater and set the knob on the controller to the 12:00 position.
- After a few moments, the green LED on the controller will begin to flash. At this point turn the controller knob to the 9:00 position. Note: From what I can tell, this is the part that diverges from Webasto’s official procedure. It seems like the “9:00 position” is a sort of random adjustment.
- Keep the heater running with the controller knob set to 9:00 for 3 minutes.
- While the heater is running, remove the brown (or gray) wire from whichever “ground” you have it connected to.
The following chart shows the altitude capabilities of the various Webasto heaters:

How Does It Work?
For many months after I completed the van I was in Florida and it wasn’t cold enough to test.
But in early December, 2019, we left for a two-month trip from Florida to California and onward to Colorado. Of course, we took the “southern route” since it was winter but we encountered plenty of cold (for Floridians) nights along the way. So, we ended up running the heater most nights in most places.
Overall the heater performed awesome. It heated the van quickly and efficiently. Many people complain about how loud it is but I didn’t find it any louder than the Propex heaters I had used in the past. The one notable difference in sound is that, with the Webasto, you hear a “click, click, click” sound when the fuel pump is running whereas there is no need for a fuel pump with a propane heater. Both the Webasto and Propex have a fairly loud exhaust sound if you’re outside near that area of the van but, with my well-insulated van, I don’t hear that inside. However, it is something you should be aware of and “listen to” if you have these heaters to know how it might affect your camping neighbors. We camped at State Parks, National Parks, Walmarts, back roads, BLM land, urban streets and everything in between and never had an issue with the sounds inside or outside.
Toward the end of that trip, we drove from northern California to Colorado in late January 2020 where the bitter cold pushed the limits of the Webasto heater. Our coldest night was in Wyoming where the outside temperatures dipped to -15 degrees Fahrenheit. The heater ran constantly but it wasn’t enough to stay warm. During those really cold nights across the high plains, my experience was that the heater could make the inside of the van about 40-45 degrees Fahrenheit warmer than outside temperatures. So, even if it’s literally freezing outside (32 degrees Fahrenheit), that’s plenty to stay comfortable. But, when it’s ridiculously cold it couldn’t keep up.
For some context, my van has 3/8″ closed cell foam insulation on the floor and 3M Thinsulate throughout the walls and ceiling. So, it’s pretty well insulated. However, in addition to the cab windows, I have a CR Laurence T-Vent window in the slider door and 2x Motion windows in the rear doors. The cab windows have insulated covers but the other three windows only have roller shades. It’s well known that the greatest area of thermal loss in a camper van is the windows. So, with less windows or perhaps insulated window coverings for the slider and rear windows, the Webasto might have performed even better.
I was also impressed with the fuel efficiency! According to Webasto, the gasoline consumption is anywhere between .04 to .07 gallons per hour. That seemed to line up with my experience. Most nights we’d let the heater run at our desired temperature all night with no noticeable difference on the van’s fuel gauge in the morning. It’s great to fill up on gas and not have to worry about adding additional fuel like propane.
Overall, the installation process is somewhat complex, as you can tell from this post, but the heater works great and I would definitely recommend it for a van camper!
Installation Tips and Advice
Making Holes
There are two ways to make the holes in your van floor for the combustion air intake and combustion exhaust outlet hoses when using the included (with the North American kits) mounting plate and gasket. One is to make a hole for each plus the fuel line inlet. The other is to make a larger, 4″ hole using a hole saw which is big enough for each of these which is much easier!
Fuel Line Routing
When you are routing your fuel lines using the rubber couplings included to connect the fuel line to the various components, be sure to “butt up” the hose inside the coupling. For “straight through” connections there should be no gap between the hose itself inside the coupling in order to prevent any air bubbles. The photo below, from the service manual, illustrates this.

Also when routing your fuel lines, be sure to ONLY use the provided hose clamps and tighten them all the way. Your standard, hardware store style, worm clams are not the same as the Webasto-provided clamps and will not work as well. Tightening the clamps all the way and using the right clamps ensures no air gets “sucked” into the line causing start up issues with the heater.
Try to keep your fuel line as short as possible. The fuel pump is a better pusher than puller, so we recommend locating it as close to the fuel tank as practical. Refer to the diagram lengths in the instruction manual if you have any questions.
Flash Codes and Typical Issues On New Installations
It is very common in new installs for the heater to report a “no start” condition using the “flash code” F01. If you have the standard rheostat controller, you will know your heater is in a fault “state” when the LED light on the standard rheostat controller flashes super fast 5x times. The specific “flash code” is indicated by the number of longer flashes of the LED. I have provided a table of all the “flash codes” and what they mean below. If you have the SmarTemp digital controller it will show you the code number on the screen which is certainly easier than counting flashes.
In new installations it’s really common to get this F01 code (one single long flash after the 5x quick flashes) because the pump isn’t getting the fuel all the way to the heater.
Priming Fuel Line
So, I highly recommend “priming” the fuel line prior to running the heater for the first time. I find the easiest way to do this is with a syringe. This particular syringe fits nicely into the supplied fuel line allowing you to pull fuel up from the pickup, through fuel filter and through the lines. You can do this from the connection that goes into the “inlet” of the fuel pump. The idea is to get the fuel all the way to the pump and then connect this “primed” fuel line to the pump’s inlet.
Wiring Fuel Pump
Many people are confused how to wire up their fuel pump. There are two short lengths of wire that come out from the combustion air intake hose connection on the heater. When you receive your heater, there is a small bag that contains the connector housing for those wires located inside the bag that contains the fuel pump. That housing can be plugged directly to the fuel pump if it is close enough for the wire to reach, or the 2 meter extension harness (included in the kit) can be used. Polarity does not matter for the fuel pump, so either wire can go in either hole on the connector housing, you can’t get it wrong.
When routing the pump wire that comes out of the combustion air intake you can drill a 1/4″ hole just above the “slot” so that when you tighten the clamp it doesn’t pinch the wire. This must be done prior to installing the heater, otherwise it will be almost impossible to get a drill into position to make the hole.
Fault Code 07 – Fuel Pump Not Working
If you don’t hear the fuel pump working (making a sort of “ticking” sound) during the startup cycle and are getting a 07 fault code below are a few common issues to look for
- The main plug that connects to the heater is not completely seated. Push down and wiggle at the same time.
- The wires are not fully inserted and locked into the connector housing that must be installed on the fuel pump wires that exits the intake tube. Sometimes installers don’t get the wires locked into the housing and when they connect to the fuel pump, the pins on the fuel pump connector actually push the unlocked wires back out of the connector housing causing an open circuit or intermittent connection problem. Carefully tug on the two wires, they should not come out.
- Faulty fuel pump (rare)
Clearing Faults/Resetting Heater in Lock-Out Mode
If you do get any type of “flash code” you can turn the heater off and then on again to clear it. However, if you experience 7x faults/flash codes, the heater will go into lock-out mode and you’ll have to reset it with the following procedure:
- Turn heater on with the controller
- Remove power to heater by either pulling the fuse that is built into the wiring harness or, if you have another fuse/switch that is easier to access, that will work too
- Wait 10 seconds
- Turn the heater off with the controller
- Restore power to the heater
- Turn the heater on
Routing Exhaust Hose
The exhaust hose should be routed so that it ends up past the outside perimeter of the vehicle. If not, exhaust gas can actually pool under the vehicle and possibly find its way back inside. It doesn’t take much, just getting it an inch away from the vehicle can make a big difference. This is one of those details that is not covered in the installation manual but is addressed in Webasto’s training for professional installers.
Deal With Dips
A general rule of thumb for all of the combustion tubing is to keep it as short and straight as possible. There is a maximum allowable length and maximum amount of bends detailed in the instruction manual. If you have any “dips” in either the combustion air intake or combustion exhaust outlet hoses you should drill a 6mm (1/4″) hole in the middle of that dip/valley so that condensation water does not collect in those dips causing a partial blockage which could cause a variety of issues including carbon build up in your burner assembly.
A common mistake people make is not “pushing down” hard enough when connecting the main wiring harness connector to the heater itself. If you are experiencing issues after your installation, double check that this connection is fully seated into the connector and locked into place.
Regular Maintenance
These heaters need to be run for at least 20 minutes at “full load” (turned all the way up) at every month. This is super important even through the warmer weather months!
You should replace the fuel filter at least once a year. If you’re read this far you know that, if you bought a Russian/European heater, it doesn’t even come with a fuel filter. We recommend keeping one or more of these with you in your van (they’re super small).
Voltage Matters
Typically these Air Top 2000 STC heaters draw less than 2 amps at 12 volts DC which makes them super energy efficient and perfect for off-grid applications. However, during startup, when the “glow plug” is turned on to start the ignition process with the fuel, the power draw can go up to around 10 amps. If your wiring providing power to the heater is long or using a small gauge of wiring, this higher current draw can cause the voltage to drop during this startup phase of operation resulting in a F03 (three long flashes) fault.
Webasto Air Top 2000 STC Fault Codes


