I decided early into my planning that I was going to use IKEA cabinets in my camper van conversion.
What I Like About IKEA
I love the modern style of IKEA cabinets and that aesthetic was exactly what I was shooting for. I was also keen on using all the IKEA organizing products that are designed specifically for their kitchens: drawer organizers that fit perfectly and maximize the space, waste bins that are the right size, storage bins that stack, and so on. In a small space this efficiency would have a big impact. I also knew that the fit and finish of these cabinets would be better than would I could accomplish myself with my tools. I’m a perfectly capable woodworker/carpenter and did plenty of carpentry for the rest of the van but, the “look” and overall finish quality of everything in the van was big priority for me. Also, it would save a ton of time. Instead of building from scratch, I would assemble the pieces and drop them into place so that I could focus on the other ten billion projects that building a tiny home on wheels requires. Of course, I also knew that there were some drawbacks and limitations to IKEA cabinets which I’ll address…
What About Durability?
I’ll start with this first question that most people have about IKEA cabinets in general and in this context in particular. I actually have a fair amount of experience with these cabinets and their durability and quality in somewhat extreme conditions. About 11 years ago, I was building a house in the mountains of Panama and considered using IKEA cabinets for this house. People immediately told me I was crazy. That’s a fact that’s well established! But, was this idea crazy? I was told how they were built from “particle board” and would “fall apart” in the tropical rain forest environment where it’s often 90% (or higher) humidity and nobody uses air conditioning to dry things out. You’re essentially living in a cloud sometimes. so the cabinets would grow mold and be ruined while fasteners rusted away. All these seemed like reasonable concerns but, long story short, I ended up finding another expat couple in a nearby town (same climate) who shipped IKEA cabinets down to Panama and installed them in their house about three years earlier. They were kind enough to offer a visit and had nothing but good things to say about the cabinets. I checked them out myself – looking closely for damage or “swelling” of the cabinet frames caused by the extreme humidity or for mold or other issues but everything checked out fine and they looked awesome. So, another even longer story shortened, I ended up installing them into my house and they’ve held up great. Here’s a picture of the kitchen after 11 years that I took two months ago (April of 2018).

I also used IKEA cabinets in my house in Florida which is a considerably less extreme place and, of course, they’re done just fine thank-you-very-much.
How They’re Made
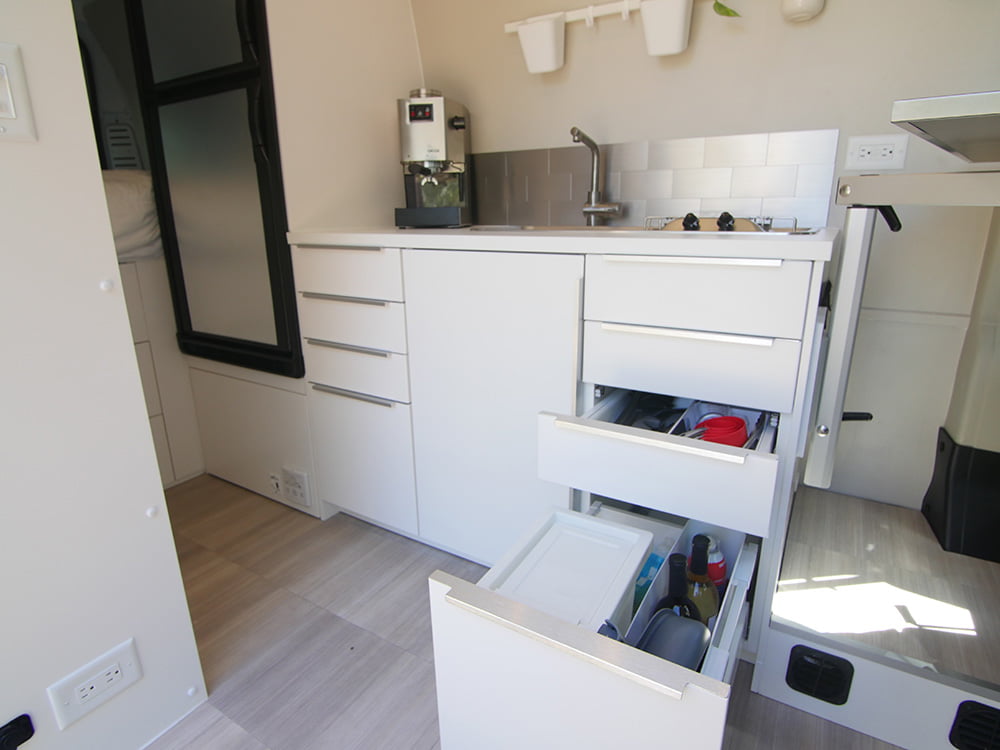
These IKEA cabinets are constructed of “boxes” made of MDF that are laminated with a melamine foil. When you put your kitchen/galley together you build these boxes/frames and then place drawers and doors in/on them. The door and drawer fronts are made from a variety of materials depending on the style you choose. They also utilize great hardware like Blum “soft close” drawer slides.
Simplified Repairs
Because of the modular way these cabinets are designed you can actually change out just the drawer and door “fronts” at any time with another style if you want to change the look of your kitchen. I didn’t realize how big of an advantage this was until shortly after I built my first van and came to a hard stop on the highway. I used had used “grabber latches” on the drawers under the bed area (more on those below), but they clearly were not strong enough and one of the drawers flew out landing hard against the floor. The drawer slide itself was broken from the force and the door front was smashed up too. After the adrenaline and anger dissipated, I realized that I could simply visit the nearest IKEA store and get a new drawer and “front” which is what I did the next day. I was able to make that repair in less than a half hour in the parking lot with only a screwdriver. If this was a custom built drawer that repair would have been impossible and that situation a much bigger bummer.

Making Them Work In A Van
There are some important things I did to minimize the limitations of these IKEA cabinets in a camper van context.
- When building the cabinet boxes/frames, I used a heavy-duty construction adhesive at all the joints in addition to the provided hardware. This should make those connections more durable and reliant if the hardware fails due to the constant vibration of driving.
- In my experience using these cabinets in the rainforest of Panama, I knew that the melamine foil that covers the cabinet boxes prevented moisture damage/swelling – even in such a high humidity environment. But, if that foil was damaged and the bare MDF was exposed, it would fail. So, I took the time to apply several coats of paint to any exposed MDF areas – notably on the backs and bottoms of the boxes where there was no melamine foil in order to protect these areas from moisture damage.
- I had to trim some areas of the cabinet boxes/frames to match the contour of the van walls where the backs met the body. I didn’t put any wall paneling up behind the cabinets so that they could be positioned as far back against the van wall as possible (note: these were also painted to resist moisture).
- I didn’t use the the IKEA “rail system” that you would normally in a stationary home for installing the cabinets. Same goes for the standard plastic “legs” you would normally use underneath the boxes/frames to adjust how far off the floor they stand and to be used to attach the kick plate/plinth. Instead, I made 2×4″ “rails” which are fastened to the van subfloor and then screwed each of the cabinet boxes to these rails in several places. I also fastened angle brackets in the upper back corners of the cabinet boxes which are screwed into the van body. These strong connection points to the van itself ensure that the boxes are firmly in place and make them considerably more rigid. Finally, I screwed each cabinet box to each other for even more strength. With all these attachment points to structural elements, the cabinets couldn’t be budged.
- I had to add latches to keep the doors and drawers shut when driving – see below for more info on that.
- I also used IKEA “cover panels” in a few places. These are panels they sell that are designed to literally cover the sides of exposed cabinets. For example, if you have a row of cabinets and the last one in that row is “seen” (not up against a wall/etc.) then you would use a cover panel to cover up the exposed side of that cabinet box/frame with the same material/finish as the rest of the cabinets. As an example, I used a cover panel designed for a “tall/pantry” cabinet as the front wall of the bath/shower that you see directly adjacent to the sliding door so that this finish matched the galley cabinets. I also used cover panels to craft my own doors/drawers in places like underneath the refrigerator that houses the hot water heater so they matched as well.
- One additional note, unlike most IKEA items, you don’t go to the store and just pick them up yourself in the warehouse are of the store. Instead, you actually have to go to the kitchen department in the showroom and place an order with an kitchen specialist and pay for that order. Then, they “pick” the items for you. You hand them your order and they give you a cart (or many carts) full of flat-packed goodness.
Grabber Latches: Keeping Drawers/Doors Closed When Driving
Note: this section of the post was updated in February of 2019 to reflect my latest build.
So, latches are very important. Since IKEA cabinets are normally installed into stationary homes, they don’t have any latching mechanisms and while the “soft close” drawers so have some resistance when pulling to open, they DO need proper latches to keep doors and drawers closed while driving.
After much experimentation in my first, and now my second (and then third) build. I ended up using grabber latches for most of the drawers and doors. I actually used a few of these on my first build as well but placed them in the “typical” location – up front where the door or drawer front meets the cabinet frame. However, in this location, these type of latches were too big (tall) for the shorter drawers and I needed a different type of latch. I ended up using “roller latches” on those which worked fine.
In my second/current build, I decided to move the latches to the rear of the cabinet for drawers. This eliminated to “too short” problem and, because the latch is now centered in the span of the drawer width, the pull is a bit more even compared to the latch being installed in the front on either the left or right side. This required that I add some simple wood framing to the base cabinets so that the “receiver” part of the grabber latch would have something to be fastened into at the right spot.
I used these 5lb “pull force” latches on the smaller drawers and these 10lb “pull force” latches on the larger drawers and the one door in the middle of the galley span.
Below are some photos detailing this installation.
 This shows the simple framing that I added to rear of the base cabinet.
 This photo shows the “receiver” part of the latches installed on the vertical framing at the back of the cabinet. One of them is circled in red.
 This shows the other part of the latch installed on the back of a drawer.
Push-Button Latches
For the three drawers that are located underneath the bed, I wanted a “positive latch” since the position of these drawers make them most susceptible to coming out under the force of hard braking, etc. So, on those drawers I used these “push button” latches. With these latches the “tongue” is actually physically behind the “catch” when closed (pushed in) and then drops down when open and the “button” of the latch becomes a handle for opening the drawer. Unfortunately, IKEA cabinets don’t have any place to put the “catch” – there is no horizontal support between drawers. The base boxes/frames are designed to hold innumerable combinations of drawers and drawers of all sizes and therefore, when you assemble those doors/drawers into the boxes you just put the hinges/drawer slides into the right pre-drilled holes. So, I had to add a horizontal support at the correct place for each of these 3x drawers in order to install the push button latches.
IKEA Cabinet Pros
- Style, fit and finish. They look awesome and frankly, nicer than what most of us DIY’ers can accomplish on our own. You can see some photos of the finished result in the gallery below.
- High-quality hinges and drawer slide hardware is included which provides soft close and smooth functionality.
- Many issues can be repaired on the road if necessary by visiting the nearest IKEA store for a replacement part vs. needing a shot/tools to fix a custom cabinet.
- Time savings: you don’t have to build these from scratch.
- If you don’t have carpentry skills, you can use these and still end up with great looking cabinets.
- It’s easy to pull IKEA drawers “out” off their rails – you just pull them out and make a certain kind of pull upward on the drawer and it comes right off. The doors come off their hinges too with a small “latch” on the hinge. This is super handy when you need to get to things for repairs, to retrieve things that have fallen behind the drawers or for cleaning. There is a photo of this in the gallery below.
IKEA Cabinet Cons
- The MDF material that the cabinet boxes are built with is heavy; heavier than plywood. I took this into consideration when planning the van and balancing the weight of all the components across the various axles/sides of the van. Ultimately, these are cargo vans and have enormous capacity. Even with this heavier material (and all the other stuff) I didn’t have a problem going over weight.
- If the MDF gets wet it’s game over. Unlike plywood which is more resilient to water damage, if these cabinets get flooded or really wet they’re toast. This is something that I just accept. However, if a cabinet gets ruined, I can replace it in a very modular way.
- You’re “limited” to the range of cabinet sizes that they offer. All the “base” (not upper) cabinets are 24″ deep and come in a variety of widths including 15″, 18″, 24″ and 30″. So, depending on your floor plan/design, this could be a limitation.
- Needing to modify the cabinets with a horizontal support between drawers if using push push button latches like these (more details on that above).
At the end of the day, I’m very happy with the outcome and I’d use them again!
What I Used & How It Works
IKEA calls their kitchen cabinets Sektion. They sell a huge variety of individual cabinet configurations which are organized into three categories. Their “base” cabinets are installed on the floor and normally normally covered with a counter. Their “wall” cabinets are normally hung on the wall above the counter. Finally, their “high” cabinets are tall and span from the floor to the top of the “wall” cabinets for use as pantries or similar. I used entirely “base” cabinets.
The “base” cabinets come in a wide variety of widths. Depending on the particular cabinet model, it may be offered in 15″, 18″, 24″, 30″ or 36″ versions. All of these “base” cabinets are available in the standard 24″ depth used in stationary houses. Some also come in 15″ depth as well.
There are tons of various types/models of “base” cabinets. Some have only doors. Others only have drawers. Others have drawers with hidden drawers inside. There are more options that you would imagine! However, they’re all built on the same foundational “boxes”. For example, if you had two 24″ wide and 24″ deep “base” cabinets in your design – one with one door and another with 4x drawers – the actual 24″ “box” for both would be identical. Then you would distinguish them (build them out) with the components included with that model. One would come with a single door (and hinge hardware) and the other would come with the four “modular” drawers (and slider hardware) which are installed into the “box”.
Here’s a link to a IKEA Sektion options.
Once the “boxes” are built and the specific components that make that cabinet installed (drawers, doors, etc.), you apply what IKEA calls a door or drawer “front”. So, in the case of a cabinet with a door, you’d have one “door front” that attaches to the front of the “box” with it’s supplied hinges. Or, in the case of drawers, each drawer would have it’s own “drawer front”. This allows all the modular components and the staggering array of cabinet configurations to be “styled” with whatever “front” style you prefer. Even more clever, you can change out the “style” of an entire kitchen (or galley) very quickly and reasonably affordably by simply taking off the old door/drawer fronts and replacing them with a different style/look (new door/drawer fronts) while re-using all the of the existing structure (boxes).
So, when you purchase IKEA cabinets, you need to specify the cabinet “model” itself (it’s unique combination of drawers, doors, etc.), what size you want (in width and depth) and what door/drawer type you wish to use with that cabinet. Ultimately, this results in a whole pile of flat-packed goodness that you get to assemble into the final cabinet!
It’s all a bit confusing which is probably why you must order any kitchen cabinets from an IKEA kitchen representative in their kitchen department. You don’t just pick up a box from the “warehouse” part of the store like you would for most of their products. I’ve found the kitchen folks very helpful.
Below is a table of all the cabinets I used in my van. All of the door/drawer fronts are the “Veddinge” style.
| Location | Model | Dimensions |
| Galley Rear | B4E (4x drawers) | Width: 15″, Depth: 24″ |
| Galley Middle | B1D (1x door with shelves inside) | Width: 18″, Depth: 24″ |
| Galley Front | B4E (4x drawers) | Width: 15″, Depth: 24″ |
| Clothes Storage Under Bed Loft | B3EE1I (3x drawers with 1x inner drawer on top) | Width: 18″, Depth: 24″ |
| Rear Door Gear Storage Under Bed Loft | BS3EE (3x drawers) | Width: 30″, Depth: 15″ |


