Why Program?
In most cases you’ll need (or want) to program/configure your Victron MultiPlus inverter/charger after it’s installed into your van. For instance, since the MultiPlus comes from the factory setup to charge AGM type batteries, if you have lithium batteries, you’ll want to, at least, change the charger functionality to charge your batteries correctly.
Note, if you have a system that uses Victron Energy Smart lithium batteries with a Lynx Smart BMS such as our external BMS power system example or our secondary alternator power system example, you do not need to configure your MultiPlus inverter/charger charge profile. In those systems, DVCC will take over and make sure your batteries are charged correctly from the MultiPlus and any other Victron charger that is digitally connected to a Cerbo GX/BMS such as a Smart Solar MPPT charge controller that is connected via VE.Direct.
Let’s Start With The Defaults
The table below shows how the settings are configured by default when you get the unit.
| Inverter frequency | 60Hz |
| Input frequency range | 45-65Hz |
| Input voltage range | 94-143VAC |
| Inverter voltage | 120VAC |
| Stand-alone/parallel/3-phase | stand-alone |
| AES (Automatic Economy Switch) | OFF |
| Ground relay | ON |
| Charger ON/OFF | ON |
| Battery charge curve | four-stage adaptive with BatterySafe mode |
| Charging current | 75% of the maximum charging current |
| Battery type | Gel deep discharge |
| Automatic equalization charging | OFF |
| Absorption voltage | 14.4V |
| Absorption time | up to 8 hours |
| Float voltage | 13.8V |
| Storage voltage | 13.2V |
| Repeated absorption time | 1 hour |
| Absorption repeat interval | 7 days |
| Bulk protection | ON |
| AC input current limit | 50A |
| Dynamic current limiter | OFF |
| WeakAC | OFF |
| BoostFactor | 2 |
| Programmable relay | alarm function |
| PowerAssist | ON |
What You’ll Need
1) A Victron MK3-USB interface. This small device allows you to connect to the VE.Bus on the MultiPlus with your computer (or compatible mobile device) using USB. You’ll (of course) need the computer or mobile device. I recommend a computer if you have it. You’ll connect a standard ethernet cable with RJ45 connectors (must be a “straight-through” not “crossover” type cable which most are) from either of the two VE.Bus connections on your MultiPlus to the corresponding connection on the MK3-USB interface and then connect the USB connection on the MK3-USB to your computer/mobile device.
One small tip, it’s really difficult to remove the RJ45 connection on the ethernet cable from the VE.Bus connection on the inverter/charger. So, you might consider breaking off the “clip” on that connector so it can pull out without releasing the clip. Chances are you have a broken one laying around anyway!
Another thing to know is that you’ll want to be sure that the MK3-USB connected to computer/device you’re using for the configuration is the ONLY device on the VE.Bus. If you have your MultiPlus connected to a remote panel or Cerbo GX you’ll want to disconnect those during the configuration.
Windows ships with a compatible driver for both the MK3-USB interface so you typically don’t need to install a driver. In case you do have issues connecting via USB, we recommend manually installing the device with the driver you can download from their software downloads page.
2) The VictronConnect software which you can either download from the Victron website or install from the Play Store for Android or Apple App Store for iOS.
Note: Victron also makes a VE.Bus Smart Dongle that basically adds Bluetooth connectivity/control to the MultiPlus interter/chargers. It connects to the same VE.Bus with an ethernet cable. When you connect to the inverter with VictronConnect via Bluetooth using this dongle you can see all of the same reporting information as well as control the state of the inverter (on/off/charger only mode, etc.) but the advanced settings (configuration) is not available unless. Because of this, you need the Mk3-USB interface for the kind of programming this post discusses. However, you might want the Smart Dongle to control and monitor your inverter/charger when you’re using your van on a day-to-day basis.
Alternatively, if you have a Cerbo device such as the Cerbo GX that is connected to Victron’s cloud service (VRM) and it’s configured correctly, you can actually use VRM’s remote configure option as shown in this video.
The following screenshot, from the VictronConnect manual shows the 3x ways to connect to a Victron product (including the MultiPlus)
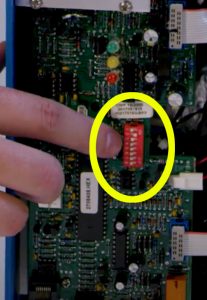
If You’re Configuring an old-version (“compact”) MultiPlus 12/2000/80…

Using VictronConnect & Updating Settings
Now that everything is connected, be sure that your MultiPlus is powered on using it’s 12 volt DC power connection to your battery bank and in “inverting” mode. Next launch the VictronConnect app. It should search the VE.Bus for devices and find your MultiPlus . When it does, you can click on it to open up the reporting. From there you click on the “gear” (settings) icon in the very top right part of the interface.

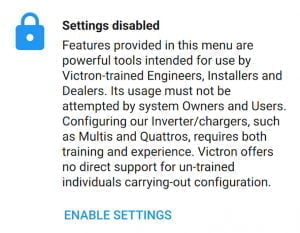
If you’d like to proceed, you can click on the “enable settings” link and enter the password zzz.
If you’ve made it this far you’ll see five main “sections” of settings: general, grid, inverter, charger and AC input control. In the video below, we’ll go through some of the settings we normally change/set in our installations. You can refer to the VE.Bus Configuration Guide (PDF) or the built in “help” inside the VictronConnect for details on all the settings and what they do. You may also find this Victron MultiPlus FAQ PDF helpful.
Firmware Updates
While you’re in these settings, you can click on the “three dots” menu at the very top right and then click on “product info” this will display the unit’s firmware version with a link to “update” if you’re not on the latest version.
Lithionics or SOK Batteries
The video shows the charging parameters recommended for Victron Energy SuperPack or Smart lithium batteries.
Each battery maker has slightly different recommendations for charging their specific batteries.
If you’re using Lithionics batteries, they recommend the following settings:
Bulk charge voltage: 14.4
Absorption charge voltage: 14.4
Float charge voltage: 13.4
Absorption time: 1 hour
If you’re using SOK batteries, they recommend the following settings:
Bulk charge voltage: 14.6
Absorption charge voltage: 14.5
Float charge voltage: 13.5
Absorption time: 30 minutes per 100 amp hours of storage
Additional Configuration Required When Using Victron Smart Lithium Batteries
If you’re using Victron’s Smart batteries that do not have built in BMS, you need to have an external, VE.Bus BMS and, more than likely, some type of Smart BatteryProtect device on your “dumb” loads which are those 12 volt DC loads that don’t have any kind of “data bus” (no VE.Bus) or way to be “triggered” by the BMS to turn on/off discharging/charging. You can check out this blog post that details an example power system that uses the Smart batteries. In addition, you’re MultiPlus needs to be “aware” that it’s in a system that is using a VE.Bus BMS which requires the addition of what Victron calls an “assistant”. At the time I’m writing this post (April 2021), this additional programming/addition of “assistants” cannot be done with VictronConnect. Instead, you need to use the older VEConfigure software with the same MK3-USB interface. You can download VEConfigure as part of the VE Configuration Tools package (Windows only) on this page of Victron Energy’s website. I detail this extra programming for Victron batteries in another post.
Using batteries that require an external BMS adds complexity so many DIY van builders prefer so-called “drop in replacement” type lithium batteries such as Victron’s SuperPack batteries or Battleborn, Relion, Renogy, etc. This blog post details an example of a system using batteries with a built-in BMS. There are some pros and cons to the Victron approach vs. the “drop in replacement”/built-in BMS approach that I write about in this post.


