This post was originally published in 2019. We think that the content in this blog is still useful, but some of the products below have been discontinued. Our conclusion remains the same: we highly recommend Energy Efficient 12 Volt DC Powered Air Conditioners!
I get a lot of questions about running an air conditioner in a van. I’ll try to address the most common ones in this post! I’ll cover what I used and why, how the installation went, running the AC off my battery bank and some power consumption tests from real world use.
Battery Friendly 12 Volt Air Conditioners
Most of this post is about my setup with a “traditional” (120 volt AC powered) Coleman rooftop unit. Since I originally wrote this post I’ve started recommending some much more energy efficient (battery friendly) 12 volt DC air conditioning options. In fact, we sell a few of what I consider the best 12 volt alternatives to standard rooftop air conditioners in our store. In any case, you can jump to that section of this post. We also have put together a spreadsheet that compares the various 12 volt units so you can see many of the important factors at a glance. We’ll be expanding this matrix over time with additional products as well as more “real world” testing!
Rooftop Air Conditioner
I choose to use a standard rooftop AC unit for my van builds for a few simple reasons. First is that they are fully road-tested. These units are “tried and true” since they are installed on just about every RV ever made. Also they are reasonably affordable. Finally, it’s out of the way and doesn’t take up any interior space or tie up any space underneath the van like some alternatives. For those interested in more energy efficient options, I’ve listed some DC-powered options at toward the end of this post.
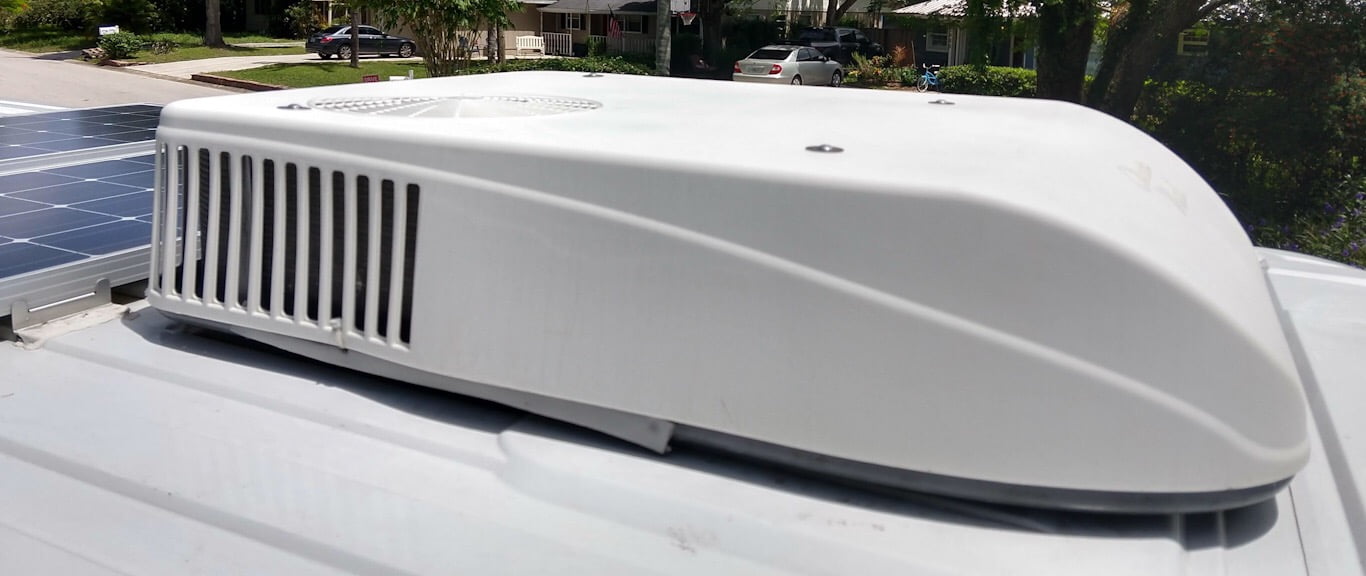
You purchase these systems in two parts: the outdoor unit (exterior part) is the where most of the magic happens and houses the compressor and most of the other parts. Then there is the “ceiling assembly” which is the part you see and interact with inside with the vents. Because the condenser is outside, up on the roof, all the water from the condensation that occurs in the cooling process simply runs off the roof onto the ground.
I used the Coleman Mach 8 “Cub” which has a 9200 BTU cooling capacity. The Coleman Mach series is also the lowest profile (least tall) rooftop units available. Overall, I’m really happy with this unit. It’s not particularly quiet but it’s not ridiculously loud either. It has 4 settings. Fan low and fan high – these are just what they sound like – it turns the interior fan on but does not turn on the actual AC. Then there is low cool and high cool that control the air conditioning function. There is a separate control for the thermostat – turn it one way to set the temp lower (warmer) and the other way to make it cooler. The fan runs continuously when the air conditioning is on and the compressor kicks on and off as needed to keep the temperature where you’ve set the thermostat knob.
Outdoor Unit
Ceiling Assembly
How Well Does It Work
It works great! Even this “low BTU” unit is plenty powerful to cool the van. I generally only run the AC when I’m in hot and humid locations like the south or here in Florida during the summer. The rest of the time the vent fan and an open “t-vent” window in the slider door keeps things plenty cool and uses considerably less power.
My van is well insulated with Thinsulate in the walls and ceiling and in hot (but reasonable) conditions the unit only runs the compressor for about 3 minutes and then turns off for about 10 minutes until repeating the cycle. That would be in a place like Georgia in the summer at night.
I did a pretty extreme stress test with this air conditioner in June in Southwest Florida. The van was parked in the driveway in full sun, the afternoon temperatures were around 97 degrees and the humidity was around 80%. The weather reports said it “felt like” 112 degrees. During this test (for about 4 hours, plugged into shore power), the unit kicked on every few minutes but was able to keep the van at 77 degrees or cooler and, of course, the AC reduced the humidity in the van dramatically which makes that 20 degree temperature difference feel much more significant.
Installation
Installation is fairly simple actually. Anyone who is doing a van conversion must get comfortable cutting large holes into a perfectly nice van. So there is that part. In this case it’s a “standard” 14″ x 14″ square hole. It’s “standard” in the sense that almost all rooftop vents, vent fans or AC units use this same sized and shaped opening.
The first thing I did was to build an wooden frame and support system inside the van. This AC unit is quite heavy (about 90 pounds), so I wanted to provide some extra rigidity to metal van roof. In my case the unit is installed just behind the cab area. I knew that I needed this frame to line up with the structural ribs in the van where I would be attaching my ceiling panels. In other words, the frame had to be the same “height” as those structural pieces. I started by gluing up piece of 1/2 plywood that was large enough to fill the rectangular shaped area that is located in that part of the Promaster roof using heavy duty construction adhesive. You can see that in the photo below with the 14″ x 14″ opening cut out.

Next I ran the 120 volt AC wiring from my load center to the AC unit location. I used 12 gauge wire for this but, since it’s a 15 amp circuit, technically 14 gauge would have been fine.
With the wiring in place I continued building the support for the AC unit by adding two longer supports directly in front and behind where the 14” opening would be from 1” x 6” lumber. This was both glued and screwed into the base. Then I used 1” x 4” lumber to complete the “sides” of the opening. Again, the combined depth of these framing materials matched the other roof supports so that when the ceiling panels are installed they can be fastened to the van ceiling supports as well as this wooden AC frame.

Next I prepared the ceiling panel for that first (front most) section of the ceiling. All the walls and ceiling panels were made from 1/4” luan type plywood that came sanded and primed which I eventually painted. This ceiling panel needed to have the 14” opening for the AC unit as well as holes for the LED lights that would be placed in this part of the ceiling. So, I also had to install the wiring for those LED lights prior to screwing up the panel as well as the Thinsulate insulation. Here you can see that first panel installed.

It’s a good idea to waterproof the wood framing that forms the 14” opening. I used liquid rubber for this task.
At this point there were many weeks of work on the conversion before I proceeded to the next step. I wanted to finish up all the ceiling panels, have them painted and also complete som other projects before continuing the AC installation.
The next step was to cut the hole into the roof. I drilled 4x holes from the interior (one in each corner) of the 14” opening as a guide. Then got up on the roof of the van and cut the opening with a jig saw. It’s really important to catch as much of the metal bits that are created when you cut through the sheet metal of the van. Ideally someone is operating a shop vac just behind the saw during the cut and then you can use a magnet and the vacuum to clean up any remaining shavings. These tend to stick to the van’s clear-coat and rust quickly. Once the hole is cut be sure to file the edges and then coat the bare metal with primer.
Probably the most difficult part of the installation was getting the roughly 90 pound beast up onto the roof. For that, we covered the side of the van with a heavy blanket to prevent any body damage then, my tall friend stayed on the ground guiding one side of the back side of the unit while I slowly lifted up the front side to get it up there. Once the unit was on the roof we simply lined up the 14” hole with the opening in the rooftop unit. These come with a heavy duty foam seal that looks like this:

Onto the inside! The ceiling assembly comes with a metal frame and 4 super long bolts. The frame fits up against your ceiling paneling and the four bolts go through this frame and up into threaded nuts built into the rooftop unit. You simply tighten these bolts to secure the rooftop unit to the van. There are white “tabs” inside – located in front of the foam gasket) that indicate when you’ve tighten these bolts enough.
Again, there was a long break between securing the AC and finishing up the installation while I worked on other projects. I wanted to wait until I was at a point of putting in all the finishing touches where things were not going to be super messy and dusty.
The last few steps wrap up the installation with the ceiling assembly. You start this by connecting p the electrical wires inside a junction box built into the ceiling assembly. This is quite simple – just use the supplied wire nuts to connect up the hot, neutral and ground supply wires to the corresponding wires on the ceiling assembly. Then you have to cut the flexible fabric duct material to the correct length and couple it to the ceiling assembly using the included VHB tape. Finally the ceiling assembly “shroud” (the part that you see in the interior) with the controls and vents is secured to the metal frame with 4 bolts.
Air Conditioning Uses Tons of Juice
There’s no way around the fact that air conditioners use a lot of electricity. My 9200 BTU Mach 8 “Cub” only runs on 120 volt AC power and draws around 11.7 amps or 1270 watts when plugged directly into shore power.
Can I Run It From My Batteries Using The Inverter?
Yes, but not for long! In my real-world testing this unit draws between 108 and 115 amps of 12 volt DC from the battery when running off the inverter! That is what I would call a shit ton of juice.
Even though the 120 volt AC draw for the unit is only around 1270 watts you need a pretty hefty inverter to “start” the unit. Basically, an air conditioner needs a lot more power to “start” the compressor running that is needed to keep it running. This means that you need an inverter with an adequate “surge” capacity to “start” the AC. In my first van, I used an 1800 watt Xantrex inverter which did not have enough power to “start” the AC despite it’s rating being something like 530 watts beyond the running wattage of the air conditioner. All inverters also have a “surge” rating that enable them to provide more power to “start” things (like AC units and motors, etc.) briefly. That Xantrex inverter had a 3,600 watt surge and that still wasn’t enough. This is one of the reasons I used the Aims Power 2000 watt inverter in my later builds. It is rated for 2,000 watts “continuous” power with a 6,000 watt surge capacity which does the trick for starting up my air conditioner.
Power Consumption Of Air Conditioner Running Off Battery and Inverter
My van has 2x 200 amp hour AGM batteries for a total of 400 amp hours. However, since AGM batteries should not be discharged more than 50%. Therefore, I have about 200 amp hours of usable capacity.
Running the air conditioner from the inverter consumes about 1 amp hour every 30 seconds. So, a simple way to think about the consumption is 2 amp hours per minute when the compressor is running. How often the compressor needs to kick on and how long it runs depends on the temperature and sun exposure. However, remember that the fan on the AC unit runs continuously. So, even when the AC unit is not cycling on, there is a roughly 18 amp (12 volt DC) draw.
In some of my testing I was in South Georgia in July in the evening. The ambient temperature was around 78 degrees but quite humid. I had the AC unit’s thermostat set to about 72 degrees. In these conditions the AC unit cycled on about every three minutes and ran for about 3 minutes.
So, realistically you can get about 60 to 90 minutes of use per 100 amp hours of battery capacity depending on conditions. In my case (with 200 amp hours of capacity), that comes out to about 2-3 hours of run time.
This means that if you wanted to run the AC for 8-10 hours – such as overnight – you’d need an awful lot of battery power – something like 600 or 700 amp hours. In AGM batteries that would be way to heavy. Lithium batteries could make this possible but they are around $1,000 per 100 amp hours which would make your battery bank very expensive ($6,000 – $7,000). Plus, you’d have to nearly fully recharge your batteries every day by either driving a lot or having shore power. And, if you have shore power, you can just run the AC unit off that!
If you’re really desperate and you have your electrical system setup to charge from the van alternator when the engine is running, like I do, you could idle the van and run the AC unit for just about as long as you leave the engine running since the Promaster alternator routinely puts out 90-120 amps. In fact, there are (were?) some “class B” RVs that came with electrical systems that would automatically start the van engine if the coach battery bank voltage dropped below a certain voltage. Personally, I don’t like the idea of idling the van engine for long periods of time.
What About Solar Panels
I’m often asked if I could run the AC off my batteries if I had more solar panels. The answer is essentially, no. My van has 2x 100 watt Renogy solar panels. Under very good conditions (direct sun, mid-day, etc.) using a MPPT solar controller (highest efficiency) this yields around 7-8 amps. You could add more panels and even higher output panels but there just isn’t enough room on a van roof to generate enough solar energy for such a power hungry appliance. And, of course, that’s when you’re parked in full sun which would obviously require the AC unit to run nearly constantly.
The Bottom Line
The bottom line on those 120 volt AC-powered rooftop air conditioners is that you really need shore power or a generator to run them consistently for any length of time.
Other Types of Air Conditioners for Camper Vans
I’ve seen some camper van builds that use other types air conditioners in creative ways. I have never used any of these myself, but here’s what I’ve seen.
Energy Efficient 12 Volt DC Powered Air Conditioners
One notable alternative to the standard rooftop units are newer products that run off 12 volt DC. For instance, this Mabru rooftop unit that we sell has all the advantages of a standard rooftop unit but is considerably more energy efficient (up to half the energy draw) so that you can run it from your batteries for much longer periods of time. Also, you don’t need to run them off an inverter – they can run directly off your battery/12 volt system and are therefore even more energy efficient than a 120 volt AC unit. The downside is that they are quite a bit more expensive.
We have created a spreadsheet that compares the various 12 volt units so you can see many of the important factors at a glance. We’ll be expanding this matrix over time with additional products as well as more “real world” testing!
Other Battery Powered 12 Volt Air Conditioners
- Mabru 12,000 rooftop AC
- Dometic RTX 2000 rooftop AC
- B-Cool 9000RM rooftop AC
- Fresair cooling unit (not a true, compressor-based air conditioner)
Portable Units
I’ve seen some van conversions that use a portable AC unit like this one. These are fairly inexpensive and generally use less energy than the rooftop options. The downside is that they are bulky and take up quite a bit of space. You also need to find a way to vent the hot air outside. Most of the examples I’ve seen have vented through the van floor. Finally, all air conditioners create condensation and you need a way for this to drain somewhere – either outside or into your grey water holding tank.
Window Units
Another option is to re-purpose a window-mounted air conditioner. Again, these are less expensive to purchase and generally use less electricity. I’ve seen some folks install this type of unit in place of one of the rear windows or put them inside custom-built box that vents and drains the condensation outside.
Split AC
Split AC units are named “split” because there is an exterior compressor that is separate from an interior air handler/fan. I have seen a few people install these into a camper van. Generally the outdoor unit is installed either underneath the van or on a hitch-mount behind the rear doors and the interior unit is, of course, inside the van. These tend to be as expensive as a rooftop AC so I suppose the advantage is not taking up any roof space or improved aerodynamics?


