** READ THIS BEFORE YOU DESIGN YOUR CAMPER VAN **
This blog post contains everything I changed or would have changed after 3 years on the road in my first van. If you would like to view this post as a video presentation please see the video above.
One of the most difficult parts of a van build is figuring out the right floor plan and fitting everything you want into that floorplan. A big mistake a lot of people make is thinking they can fit everything they have in their house or apartment into a camper van. There are going to be some sacrifices and things you’re going to need to go without. The problem is, if you haven’t ever lived in a van, how do you know what you’re going to REALLY need and what you can do without. There are going to be things you thought you needed that you actually don’t and there are going to be things that you didn’t even realize you needed. You can do dozens of hours of research and you can go down the Youtube rabbit hole, but everyone’s needs are different and you’re not going to be able to know what’s best for you until you actually live in a van for at least a year.
I’ve lived in a van full time for three years and another two years part-time. I’ve participated in over 15 van builds and I own a company that specializes in the best vanlife products for DIY van builders. I consider myself an expert in camper van design and floor planning and I enjoy the challenge of maximizing the functionality of tiny spaces.
In this blog post I simply want to share my experiences and thought process to give you food for thought so that you can take whatever nuggets that resonate with you and incorporate them into your van build. Full disclaimer: Not everyone is the same! Some people want a cook’s kitchen and some people barely cook at all. Some people want a luxurious bathroom and some people are happy showering outside, at the gym or a campground.
After living in a van for five years here are some of the things that I want you to think about.
Toilet
The majority of people choose to do a composting toilet and that’s what I did on my first van. While I was happy with the toilet, I actually never (not a single time) went #2 in that toilet. I went #1 in it all the time, but honestly I could have just as easily just used a pee bottle. The urine tank on a composting toilet is annoying to empty every couple of days and spending over $1,000 on a glorified pee bottle felt like a waste of money to me. Sure it was nice to have the toilet for #2 in case of emergency, but I found myself using public bathrooms all the time (gym, campground, gas station, hotel lobby, grocery store, mother nature).
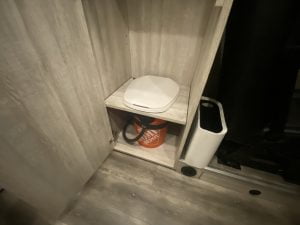
For me the solution I came up with for my second van build was a cabinet with a toilet seat on top and inside the cabinet was a bucket and a urine diverter. The bucket was lined with a trash bag (for emergencies only) and it doubled as my cleaning supply storage since I never used the bucket. The urine diverter was routed into an 8 gallon blackwater holding tank under the van. I only needed to empty the tank every few weeks and it was as simple as finding a dump station and flipping a switch. Doing my toilet this way saved me about $900 and was way better for my needs because it provided an emergency #2 solution and eliminated the disgusting chore of emptying the urine tank on the composting toilet. Alert: I understand this option might sound ludicrous to some people and you might be saying to yourself “Hell NO” and that’s ok. This is what worked best for me and my preferences.
Shower
Showers are one of the hottest topics in the van build debate. Some people won’t do vanlife without them. People like me are perfectly happy taking an outdoor shower or showering at campgrounds, national gym chains like Planet Fitness or Anytime Fitness, truck stops, rec centers, the beach, friends houses, etc. The argument for a shower in your van is obvious. It’s easy, convenient and luxurious to have a shower in your van. You can literally shower whenever and wherever you want. A shower in your van also usually means a private place for your toilet which is an obvious added benefit. The argument against a shower is that they are limiting to the floorplan and visually make the van feel tight and cramped. Another drawback is that they use a ton of water which makes having to refill and dump your water more of a frequent occurrence. One thing I decided on my next build is to do a convertible shower, like this one, for those times when it’s too cold outside, or I’m too tired to go to the gym or an available shower is just too far away to bother. My plan is to shower outside, at the gym or at campgrounds whenever possible, but for that 20% of the time when those types of showers aren’t available I’ll have an indoor shower available to me. I’ll be combining the shower with this greywater tank, but more on that below.
Shoe cabinet
Many people don’t account for shoe storage on a van build and to me it is one of the most important things to think about when designing your van. In a house, you are usually walking over a lot of grass or concrete before you get to your front door, so your shoes are relatively clean by that point. In a van, you’re going to be doing a lot of outdoor activities and are usually walking over dirt, sand or mud (like at a trailhead) just before you step inside your van. The last thing you want to do is track all that stuff into your tiny sanctuary.
The solution I incorporated into my second build was a rubber lined shoe drawer near my front door. I could sit in the doorway and take off my shoes and not worry about tracking all that nasty stuff in the van. In my first van I didn’t do that and I ended up having to stuff dirty hiking boots under my driver’s seat and in other places they didn’t belong. By just having a dedicated shoe drawer near your door, you will save yourself a lot of time cleaning and a lot of stress of figuring out where to put your dirty shoes.
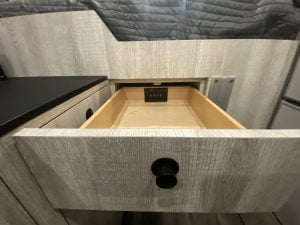
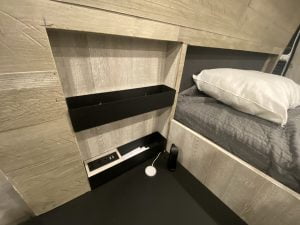
Charging drawer
This one is all about reminding you that your home on wheels is always moving. If you have a lot of devices that need to be charged then you can’t just leave them on the counter like you would in a house. There have been many (too many to count) times, especially when I was a vanlife rookie, that I forgot to put something away upon taking off on an adventure. As soon as I turned a corner, everything I left on the counter went flying. Cleaning up the ensuing mess is never fun and paying to replace damaged electronics is even less fun.
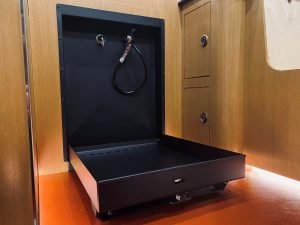
The solution I came up with for this is a dedicated foam-lined charging drawer. Inside the drawer is a 12v and 110v outlet. You can charge your GoPro, Garmin, cell phone, DSLR batteries, Drone, portable charger, laptop, etc without ever having to worry. I also installed a locking latch on this drawer to make it extra difficult for would-be thieves to steal my goodies.
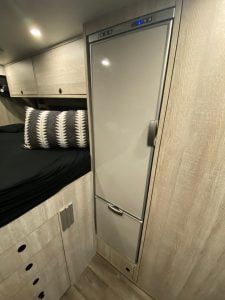
Fridge at Eye Level
I don’t like to think of myself as an old man, but bending over or squatting everytime I needed to get something out of the fridge or put away groceries had my lower back begging for mercy. After 3+ years of an undercounter fridge, I decided enough was enough.
If you can work an eye level fridge into your floorplan I highly recommend it. It will make your life a whole lot easier and it provides the familiarity of a house refrigerator. You can get an undercounter fridge and mount it on top of a cabinet or you can get a tall fridge. Either way you’re going to love not having to bend over everytime you want a beer. **Also, I recommend getting a fridge with a decent size freezer like these. I like to boondock and having a large freezer means you have a way of keeping food fresher longer.
Throw all bin/cabinet
I planned and planned my first floor plan and believed I had thought of everything. I thought wrong. Even though I thought I had accounted for everything I forgot about my backpack. When you get back from a long hike you can’t just throw your backpack on the floor…it will be in the way. You can’t just throw your backpack on the ground, you’re going to want to sit down and relax after a long hike. The backpack is always in the way!
My solution for this was to dedicate a cubby specifically for my backpack. You could also add a hook and hang it up, but my backpack is heavy and it would bang around when driving. I suppose I could hang it up and strap it down, but it’s much more convenient to throw it in a cubby/cabinet.. I suppose I could also put it in the garage after each hike, but there are supplies that I frequently want to get in my backpack. To make matters worse, if you’re like me, you might have two backpacks! One for hiking and one for the gym. I use the gym backpack for workout gear, shower supplies, a towel and change of clothes. Thankfully my cubby fits both backpacks.
Mattress
Don’t cheap out on your mattress. Living in a van can sometimes be uncomfortable. But that’s ok because you’re trading comfort for freedom. The one thing you should splurge on is a nice mattress so that you can have a little bit of luxury and wake up well-rested for your adventures. I like the look of the and functionality of a dinette bed combo, but to me it’s not practical for several reasons. First, you’re going to lose most of your garage storage in the dinette setup. Second, when I’m done with a long day of hiking or kayaking, the last thing I want to do is build my bed for the night. Third, if I’m driving a long haul and want to pull off for a nap, I just want to jump in bed as soon as possible. Last, you can’t convince me that seat cushions that double as a mattress are comfortable. They might be fine for a month, but after a few months, you just can’t beat a well made mattress. **Also I highly recommend installing your bed as low as reasonably possible. It’s nice to be able to sit up in bed and makes the area feel a lot less claustrophobic.
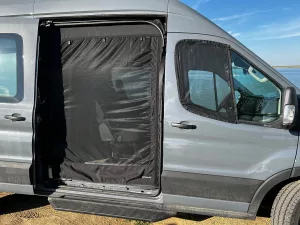
Quick Hits: Bug Screens
Bug screens are almost a must have. I didn’t have one in my first build and I definitely regretted not having one. I was limited to my tiny windows for ventilation and it would have been nice to open my sliding door in some situations. Fortunately, Vanlife Outfitters carries some really good looking bug screens that are fairly easy to install and customized for Sprinter, Transit or Promaster.
Quick Hits: Hot sauce/spice rack
If you cook a lot, it’s really nice to be able to access all your spices and sauces rather than digging into a cabinet multiple times. You can also use part of the rack for storing other items that you need frequently
Quick Hits: Pull out trash and laundry
Don’t forget that you’re going to produce trash and laundry. Make sure that you’ve designated a place in your build for those stinky items. I highly recommend lining it with cedar. I like to have a small trash can so it forces me to throw out the trash before it starts to smell.
Quick Hits: Larger sink or dirty dishes drawer
I like a larger deeper sink than most people would put in a camper van. You can wait a little longer to do the dishes, you can wash clothes in the sink. I’m willing to sacrifice a few extra inches on my countertop for a larger sink. But that’s just me, you do you.
Quick Hits: Larger Freshwater and Greywater Tank
One of the biggest pain-in-the-butts of vanlife is finding spots to fill freshwater and dump greywater. This can especially be problematic for boondockers or urban stealth vanlifers. My first van had 20 gallons and that was a lot in comparison to some other van builds, but when planning my van builds from scratch, I don’t do anything less than 40 gallons anymore. It’s really nice not having to fill freshwater as often. On the flipside, my greywater tank was 7 gallons, and finding a place to dump my greywater was also an issue. Dumping your greywater on grass or the street, even if you use biodegradable soaps and toothpaste, is somewhat of a “grey area” (pun intended) for many vanlifers. I personally like to dump my greywater at an official dumpstation whenever possible and I never dump on public lands. Having a larger grey water tank like this one from Vanlife Outfitters really cuts down on the amount of trips to the dump stations.
Quick Hits: Fixed dinette
It’s nice if you can incorporate a fixed dinette into your van build. Some floorplans won’t permit this but I really wanted to be able to sit down and work or eat without having to enter into a process to transform my seating area.
Quick Hits: 12v Air Conditioner
I had the “Two MaxxFan Method” in my first van and that was fine for travel out West, mostly at higher elevations. If you’re going to traveling in the south, don’t have a high tolerance for heat or if you have fur babies, then you’re going to probably want to get a 12v air conditioner like this one. The downside is that you’ll also probably need a larger battery bank. As our climate changes and things really start to heat up, 12v Air Conditioners are quickly becoming a non-negotiable for some vanlifers.

Quick Hits: Insulated curtain or wall
Most of the heat and cold are going to come into your van through your cockpit. It’s good to have a plan to
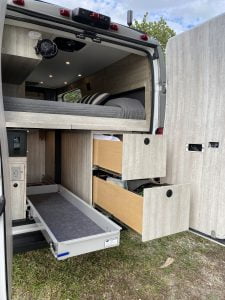
Quick Hits: Garage Drawer System
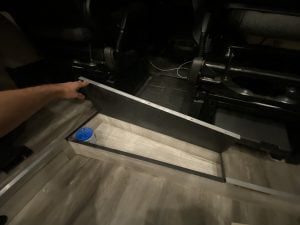
On my first van I had the black rubber bins from Home Depot to store all my gear. No matter how hard I tried to organize my bins, based on how frequently I needed the gear, the item I needed always seemed to be in the back of the garage on the bottom bin. That meant I needed to take out all the other bins to get to the bin I needed. On my second build I added a large 42” long double drawer on 250lb drawer slides. Getting things out was so much easier. I also really like having this cargo pull out tray which is rated for 800lbs. I’ll never have 800lbs on it but it’s really smooth when I have all my storage containers with tools and heavy equipment on it.
Vanlife Outfitters has been supporting DIY camper van builders since 2016. We have a large collection of blog posts, videos, tips, resources, information and products to help you on your journey into vanlife. If you got any useful information from our site please let us know and if you’re in the market for products to build out a van please consider supporting our store!