In this post, I’ll dive into how I’m using a Starlink system in my Promaster camper van including mounting it to the van’s roof using a Speedmount and powering the system directly from my 12-volt battery bank without needing 120-volt AC power from either my inverter or shore power using a 12/24-volt DC power adapter!

The dish I’m using is the so-called Gen 3 which doesn’t have the motors to adjust the positioning of the dish like the older, Gen 2 models. Instead, it has a sort of “kickstand” that is supposed to position the dish at a useful angle to the sky.
But, I’m not using this kickstand – instead, I’m mounting it flat on on my roof using a Speedmount which is basically a “frame” for the Gen 3 dishy that has feet to be mounted to something like a vehicle. The feet can be through-bolted to a roof or a roof rack or you can choose to configure the product to ship with very strong magnets which are bolted onto the feet of the Speedmount so that the entire assembly can be mounted to a metal roof (like a van) magnetically. If your rig’s roof isn’t metal (like many RVs), you can also configure the Speedmount to include metal discs that are the right size for the magnetic feet that can be stuck to your roof using the included VHB tape.
So, I’m not using the “high performance” dish which is considerably more expensive.
Even mounted flat (without the kickstand) my initial testing with the Gen 3 dish is impressive! Parked in an area with reasonable (but not completely wide open) sky views, next to a building with trees and such in the parking lot that are not too far away, the network performance is really good. Check out the 12-hour report below with only 28 seconds of “obstructions”. This is way better than the Gen 2 Starlink in similar conditions.
![]()
The Speedmount is made of waterproof and UV thermoplastic that will not warp and not only mounts the dish but also provides some protection to the edge. It’s extremely low profile at only 1.85” in height (1.9” with magnets).
Assembly
The Speedmount ships in 4x pieces that are labeled one through four. Assembly is super simple and quick. Since I am using the magnetic feet, I bolted on those magnets to each piece. Then I assembled pieces 3 and 4 then slipped dishy into that side of the frame and then continued wrapping dishy on the other side by assembling pieces 1 and 2. Finally I completed the “frame” by bolting the two sides to each other. All this is with supplied stainless steel bolts and nylon locknuts. The video below shows the assembly with some snappy music.
Through Bolting
If you’re through bolting the Speedmount feet either through a roof or to a roof rack, we recommend that you assemble the frame by bolting the 4x pieces together without the dishy inside the frame. Then…
- If you’re bolting through your roof, determine the position of the Speedmount on the roof taking into consideration any “obstacles” or important things that might be on the inside of the rig at that location. Then mark the hole locations that are in the center of each “foot” of the mount (each corner). Then you can drill those holes (the 65mm bolts included with the Speedmount are M6 size). After drilling be sure to clean the holes and protect them with paint to prevent corrosion. Next, insert a bolt through the mounting hole in each foot and disassemble the Speedmount enough to be able to insert the dish while keeping the mounting bolts in place. Some painters tape can make this a lot easier! Once the dishy is inside the frame of the Speedmount you can apply some sealant on each foot – using unbroken rings outside the mounting hole so that the Speedmount will be sealed to the roof and water will not get into the area where the bolt hole is located. We recommend something like 3M 5200 or Loctite PL Marine. Finally drop the Speedmount, with the bolts through the drilled holes and use the supplied washers and nylon locking nuts on the interior of the rig to secure the Speedmount to the roof.
- If you’re bolting to a roof rack, you’ll go through a similar process as above, but without the need for the sealant. If you have a roof rack constructed from 8020, you can position your t-nuts in the locations of each foot’s mounting hole.
To Seal or Not to Seal
Note, I used some of the Loctite PL Marine sealant where the Starlink-provided Ethernet cable plugs into the bottom of the dish as shown in the photo below. This is either a really great idea or a really terrible one – time will tell 🙂 The “weatherproof” RJ45 plug that is at both ends of the Starlink dish-to-router connection cable is supposed to keep water out but, with this thing up on my van roof with the potential for driving rain and such, I wanted to ensure that no water would get in there. Because of the weatherproofing, the Starlink RJ45 plugs don’t have the locking latch normally found on those types of connectors and they sit pretty snug into the dish and, on the other side, the router. Typically you can simply pull on the cable to remove it since there is no latch. If I ever have to remove the cable from the dishy, it’s going to be, well, more difficult.

I also used some velcro to keep the kickstand from flopping around. I hope.

Stick To It
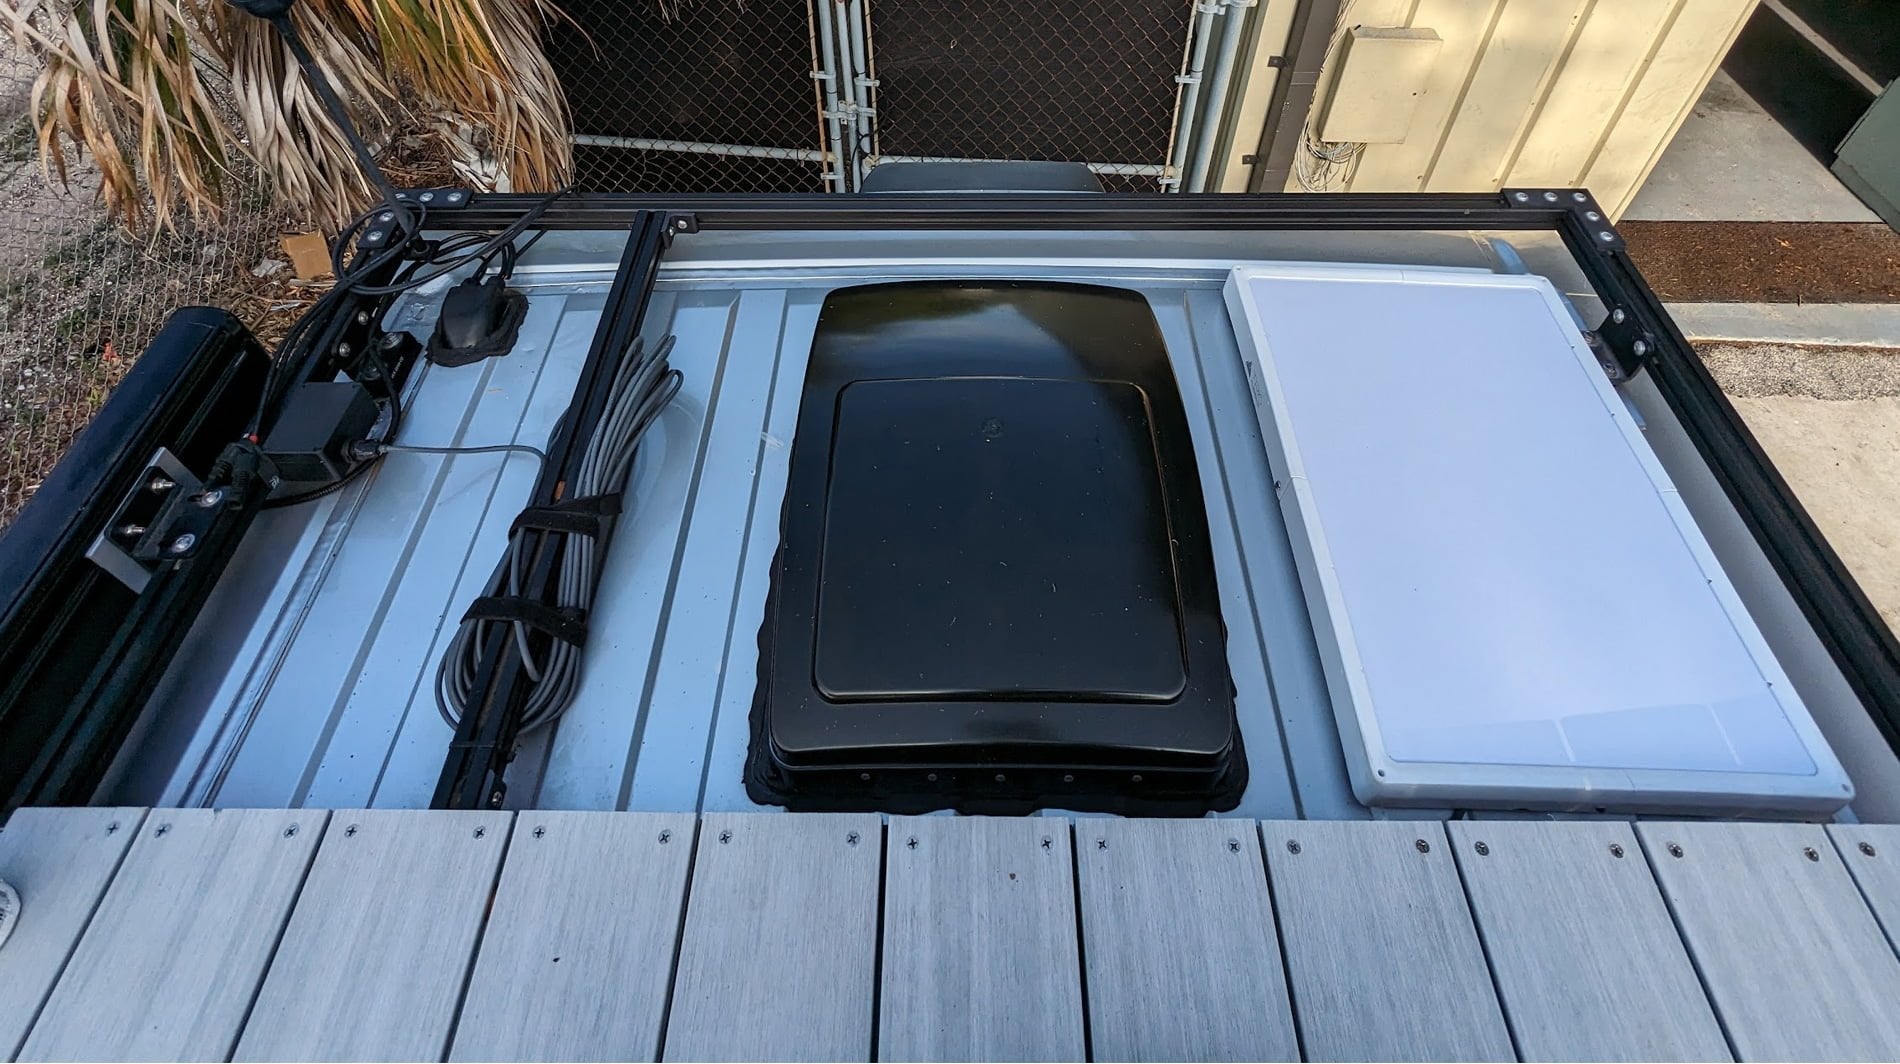
Because my van rocks a secondary alternator power system, I don’t need permanently mounted solar panels. So, I use that roof space for an awesome roof deck. I do have some portable, folding panels that I can put up there when I’m going to be stationary but I don’t use them very often. Behind the deck is a Maxxfan over my bed area but there was an open space behind the deck, on the driver side rear, where I put dishy. The magnetic feet location line up pretty well with the high points of the corrugations on the roof of the Promaster as you can see in the photo below. If you want to check how the “feet” of the Speedmount land on your roof, check out this dimensional drawing.

When I build out vans, I try to anticipate changes – particularly those in systems and technology – since I’m a nerd. For instance, I over-gauged the wire running from my Promaster battery to the 30 amp Orion DC-DC charger because there were “rumors” of a 50 amp version of that coming out. The rumors were right and the 50 amp Orion XS is here! I also ran a cat6 network cable from the roof all the way to the storage bin above the cab in a Promaster which is where I put my older, Gen 2 Starlink router. This made the Gen 3 Starlink installation much easier. So, I suppose that’s a tip – consider running additional wires and/or adding conduit during your builds for future upgrades
What you see in the photo below is dishy in the Speedmount magnetically attached to the roof on the driver side, the Ethernet cable that comes with the Starlink system is attached (and sealed) to the dish and then runs over to a waterproof box on the passenger side where it’s connected to a weatherproof, female RJ45 female jack. I used the same Loctite PL Marine adhesive here to seal the connection. From there, the cable I pre-ran is used to connect the dishy to the router inside the van. I have the excess cable to dishy on the roof coiled up and velcroed to a crossbar. The idea here is that if the van is parked in an area with limited sky view (forested campsite, etc.), I can pull dishy off the roof and use that excess cable to position it in another spot with more sky.


Powering Starlink Gen 3 with 12-Volt DC Power

The Starlink system comes with the dish, a router and a fairly large AC adapter box that you would normally plug into an outlet at your house. In a camper van, this would require you to either have shore power or have your inverter turned on whenever you were using Starlink service.
But, we sell a power adapter for 12 or 24-volt systems that allow you to power the Starlink system directly off DC power from your battery bank which is more energy efficient! This adapter replaces the Starlink AC adapter. It comes with red/black bare wires that you connect to a DC branch circuit and a plug that goes into the back of the Starlink router to power the system.
Below you can see the Starlink router (highlighted in green) and the 12/24-volt power adapter (highlighted in red) installed into the storage area above the cab in the Promaster van. The router is held down with Velcro and the power adapter is tucked into the corner. Note, both the router and power adapter get pretty warm.
I also added this remote controlled switch that allows me to turn off the Starlink system when I don’t need it since it does consume a fair amount of power.

Running the system from the 12-volt DC power, I’m seeing around 60-70 watts of power consumption on average. It typically hovers around 62 watts. This is of course, in Florida with no need to melt snow! Below is a screenshot from the newer UI for GX devices showing a moment of 81 watts consumption but there is about 16 watts of other “idle loads”.

PS: if you want your mind completely blown and to have the proper appreciation of the miracle of Starlink, check out this video!


